
Output, a developer that creates unique instruments different from other software instrument, offers a subscription-based loop synthesizer called “Arcade”. This software allows for intuitive composition using MIDI controllers such as keyboards and pads, making it a great option for those who cannot play an instrument or do not understand music theory. In this article, we will review Arcade and explain how to use and register for it.
1. What is Output “Arcade” ?
Output operates a subscription-based loop synthesizer, available on a monthly or yearly basis. Kits containing loops and more are constantly added, allowing users to download and use them without worrying about copyright issues. This software allows for intuitive control of loops assigned to keys, making it a great option for those who cannot play an instrument or do not understand music theory.
In addition to being available as an extension for composition software DAW as a VST or AU plugin, it can also be used as a standalone application. With the update to version 2.0, Arcade can now be used not only to control loop samples but also like a regular synthesizer.
| Development company | Output |
| Price | Monthly Payment: $10 Annual Payment: $99 |
| Main Specifications | Loop synthesizer |
2. Advantages
There are four advantages when using Output’s Arcade:
- A 30-day free trial is available
- The software is constantly updated
- It can be used intuitively by those who cannot play musical instruments
- Users can create their own kit.
(1)There is a 30-day free trial

Arcade offers a 30-day free trial period for users to try the software. This allows potential users to test it out and decide if they want to continue using it. To avoid being charged, users must cancel their monthly payment within the 30-day trial period. Details on how to cancel the monthly payment will be provided later in this article.
(2)Constantly updated
Arcade is constantly updated with new kits and loops, allowing users to download and use whatever they like without worrying about computer space. It does not force downloads, so users can select and download only what they need.
(3)Even those who can’t play musical instruments can handle it intuitively

Arcade’s sampler kit includes 15 loops that allow users to create music immediately by simply pressing the keys on the keyboard. This feature is quite convenient and intuitive, making it an ideal tool for those who cannot play musical instruments and do not understand music theory. With Arcade, anyone can create their own music quickly and easily.
(4)Make your own kit
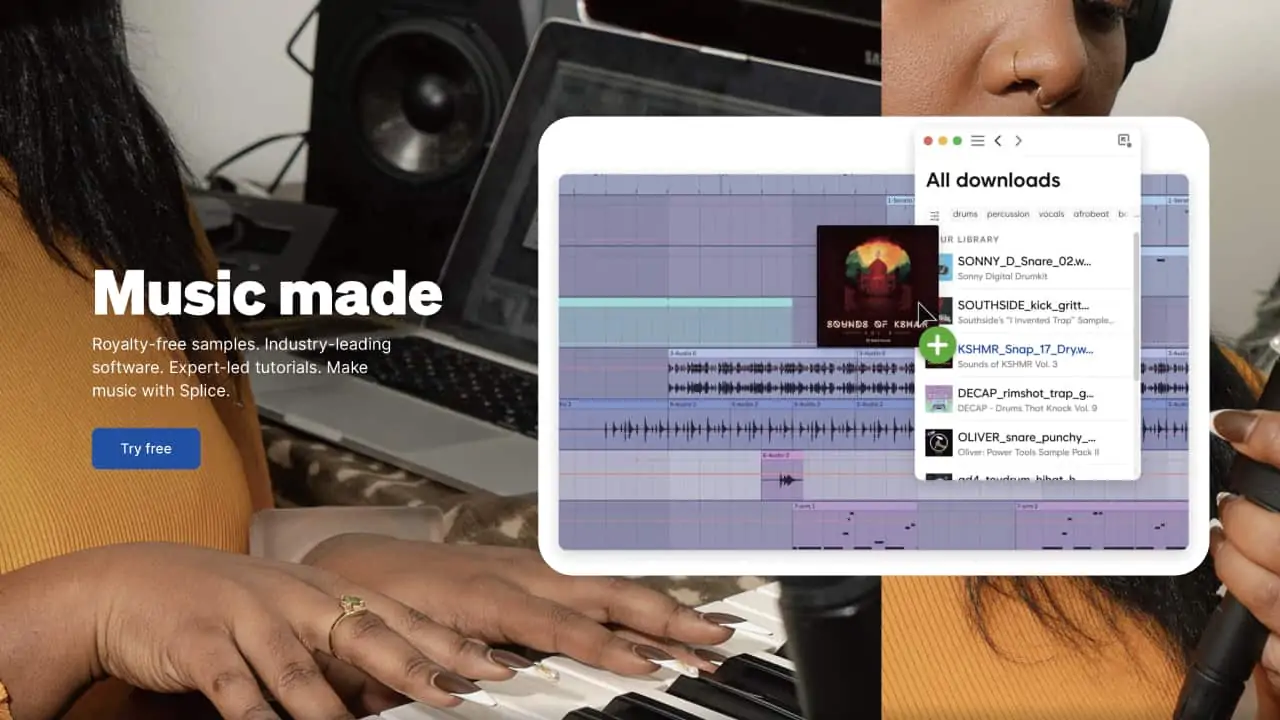
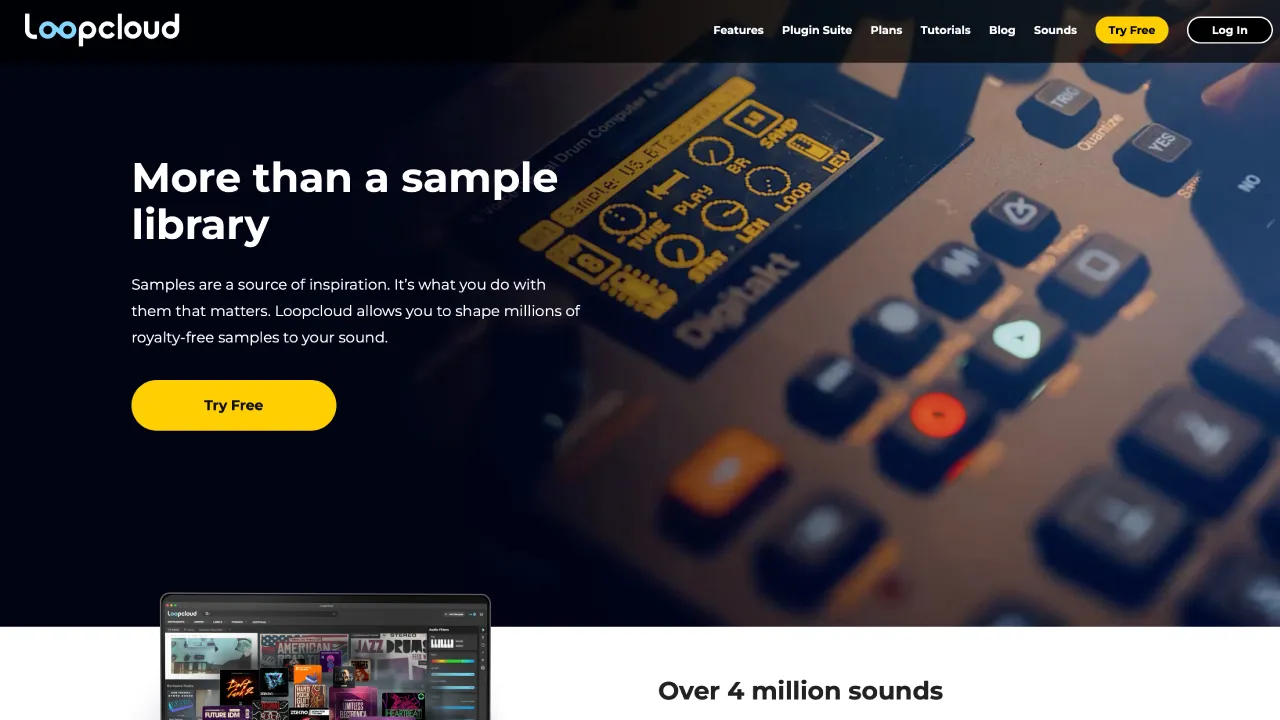
Arcade can also handle users’ own samples, making it even more versatile. Users can use sample services like Splice Sounds and Loopcloud to use Arcade effectively and create their own unique kits.
3. Disadvantages that you should know before using
However, there are a few points to keep in mind before using Output’s Arcade:
- High CPU usage
Depending on the presets and usage, Arcade can be a heavy plugin that can consume a high amount of CPU resources. While it should not be so heavy that it makes it impossible to use, it may require a certain level of computer specifications to run smoothly.
4. sale information for Arcade
Arcade can be used at a discount such as a 3-month free trial or a 20% off sale by referring friends in addition to the free trial.
5. How to register for a free trial
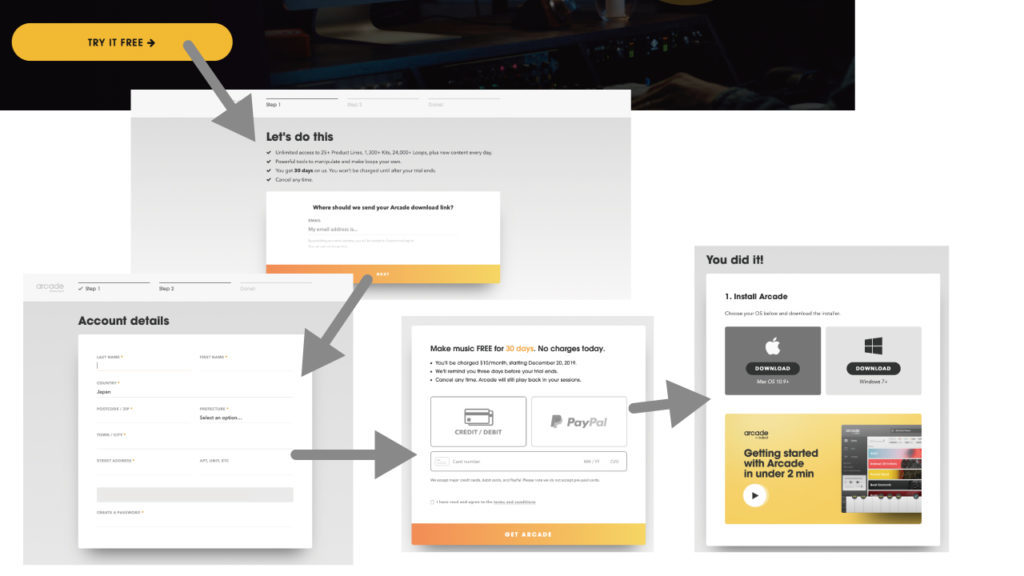
Arcade’s free trial can be completed in 5 steps as follows:
- STEP 1. Choose “Try Arcade free” on the Arcade page of Output.
- STEP 2. Enter your email address and select “Continue.”
- STEP 3. Select your favorite genre and your direction of music production, then select “Continue.”
- STEP 4. Enter your first name, last name, country/region, ZIP code, prefecture, town/city, street address, and password, then select “Continue.”
- STEP 5. Choose a payment method (annual or monthly) and select “Get Arcade.”
After that, download and launch Arcade on Mac or Windows and log in to complete the registration. However, you must cancel your subscription within 30 days to finish it for free.
How to unsubscribe
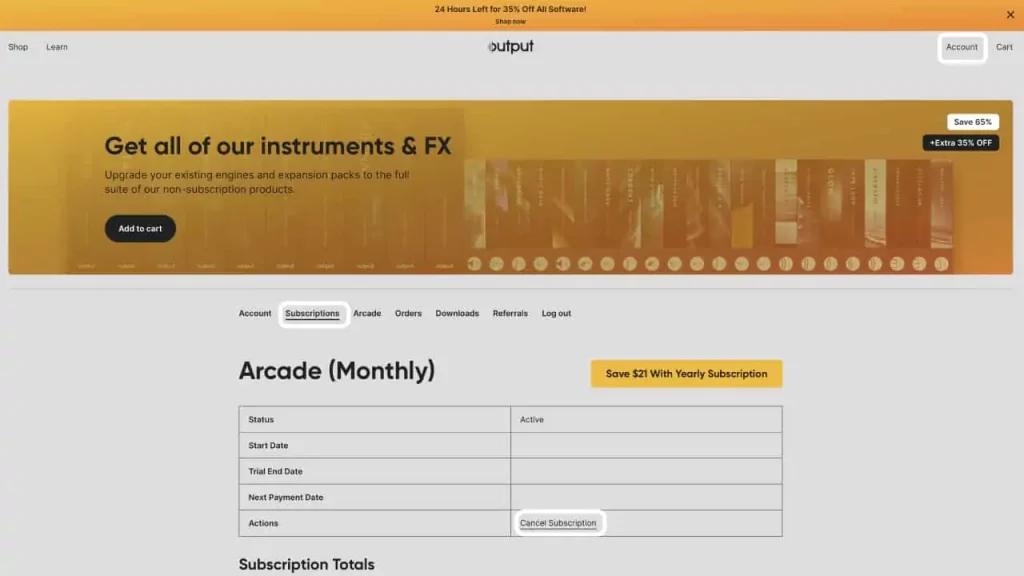
Log in to Arcade with your email address and password from “Log in” on the top right of the Output page. Then, select “Subscriptions” in “My Account” on the top right, and choose “Cancel Subscription” to cancel.
5. How to use
Here, we will explain how to use Arcade. Please refer to the official English manual here.
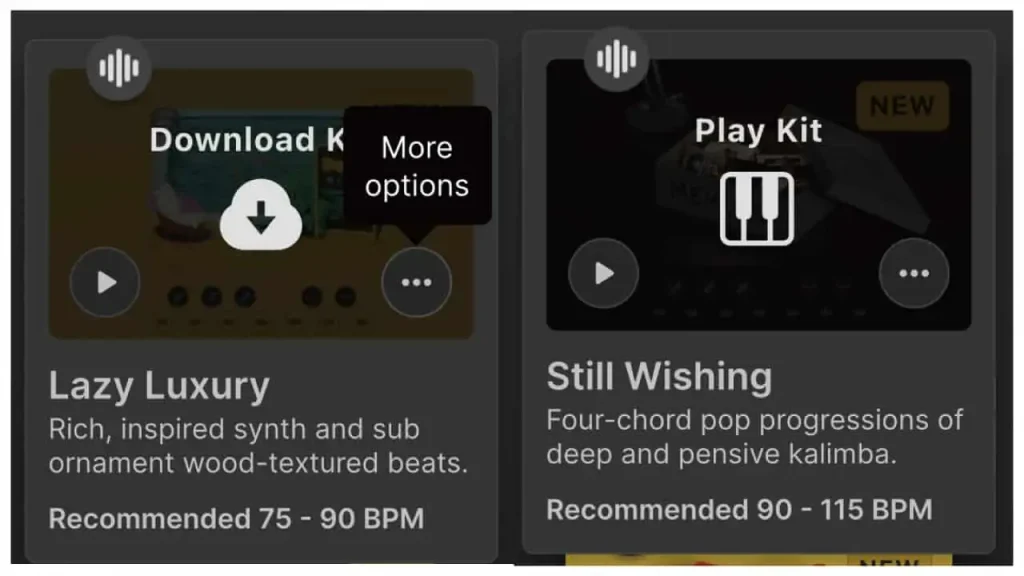
After starting Arcade, you can select several menus from the top left. If you find something you like, you can download it from “Download Kit” and move to the play screen from “Play Kit.”
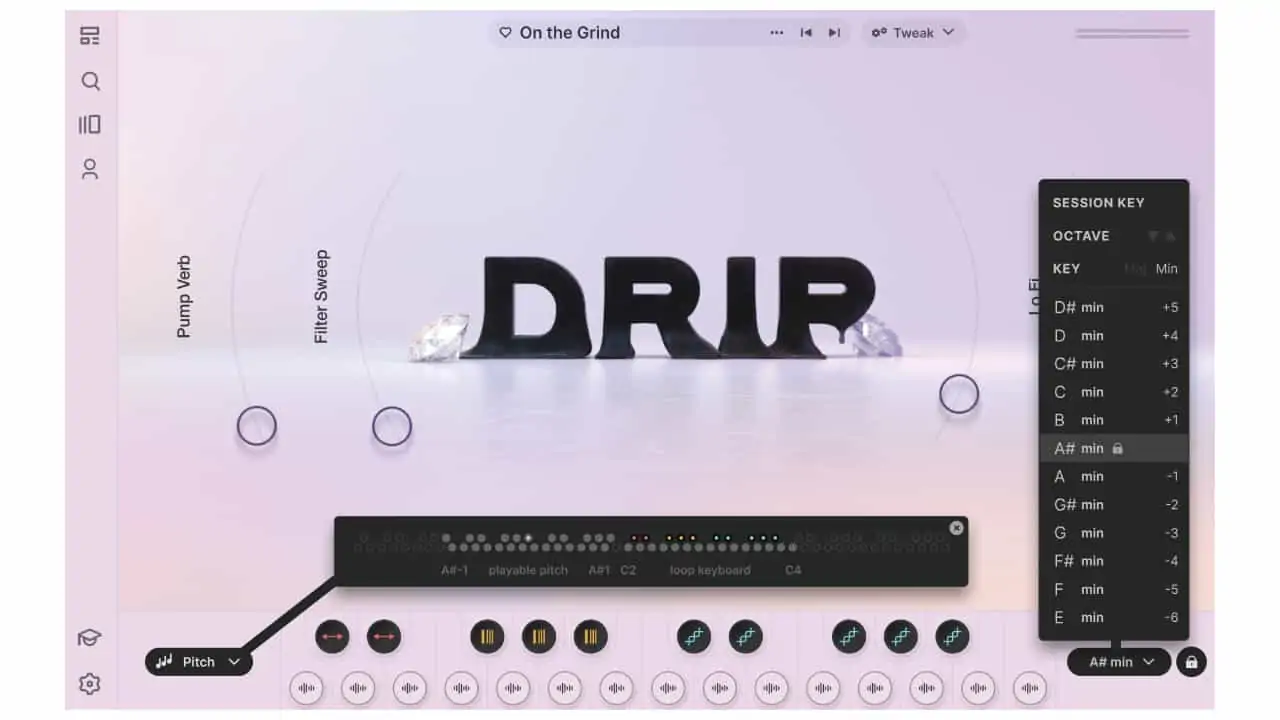
Feed: The feed is the landing page for Arcade, where you can view the latest content, such as new lines and kits.
Search: You can search and access all Arcade sounds. If you select “Show Downloaded Only,” only the content you have already downloaded will be displayed.
Lines: The sound collections are displayed according to the common theme or musical purpose of each line. Each line has a library of kits that are constantly expanding.
Your Stuff: This section displays the kits or samples that you have customized, edited, saved, or added.
Arcade now offers three types of options: Sampler Kits, Note Kits, and Samples.
Sampler Kits: Similar to the previous version, it allows you to play sample loops assigned to the keyboard with white keys and arrange sample playback with black keys and effects.
Note Kits: A mode where you play notes that match the keyboard like a regular synthesizer.
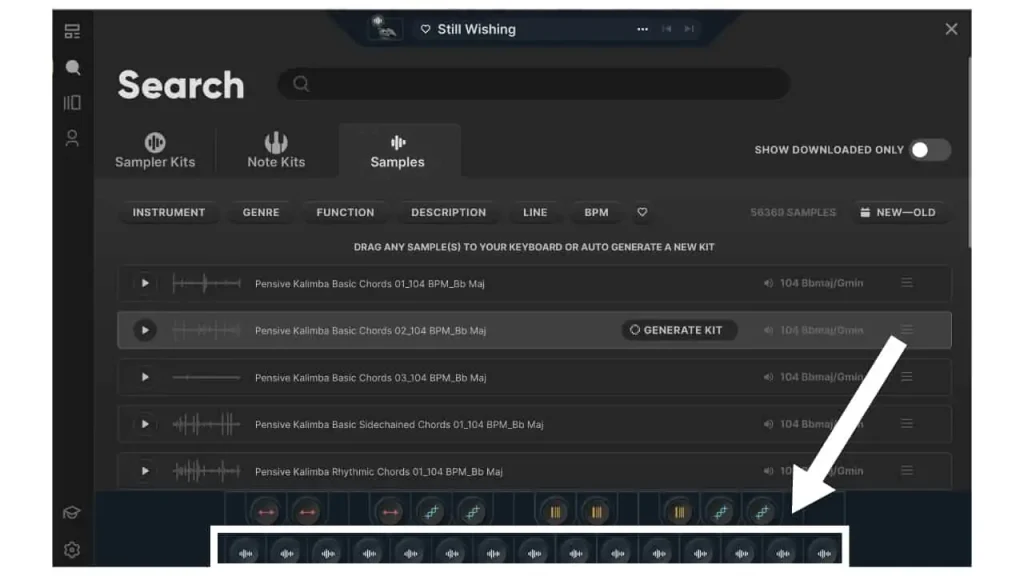
Samples: You can select each sample individually. By selecting “GENERATE KIT” after hovering over a sample, you can create a kit using that sample. You can also assign individual samples by dragging and dropping them onto the lower keyboard.
Sampler Kits
For Sampler Kits, white keys from C2 to C4 are loops, and black keys are effects for loops.
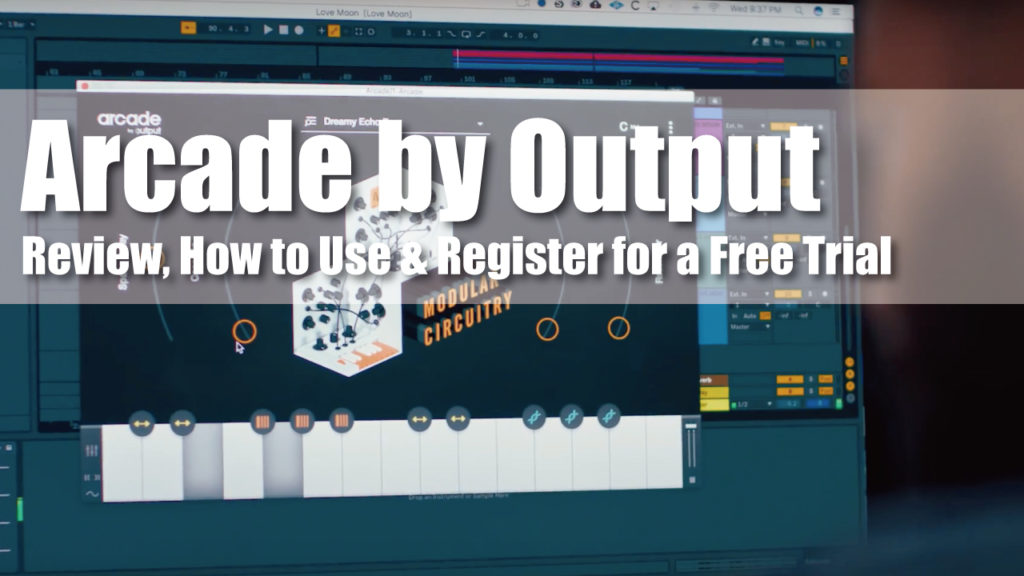
Pitch (Playable Pitch): The keyboard is enlarged from “Pitch” on the left end of the lower keyboard, allowing you to change the overall pitch in real-time by selecting keys in the Playable Pitch area, which is displayed separately from the loop playback area.
Key: You can set the key and octave on the right end of the lower keyboard. If you select the lock button, the key will be fixed even if you change the kit.

When you hover over a white key and select “…” displayed at the top, four menu options will be displayed:
- Hold: Holds and loops the sample playback.
- Generate Kit: Creates a kit using that sample.
- Remove Sample: Deletes the sample.
- Edit: Edits the sample. This function is the same page as “Tweak” → “Sample Edit” at the top.
Sample Edit
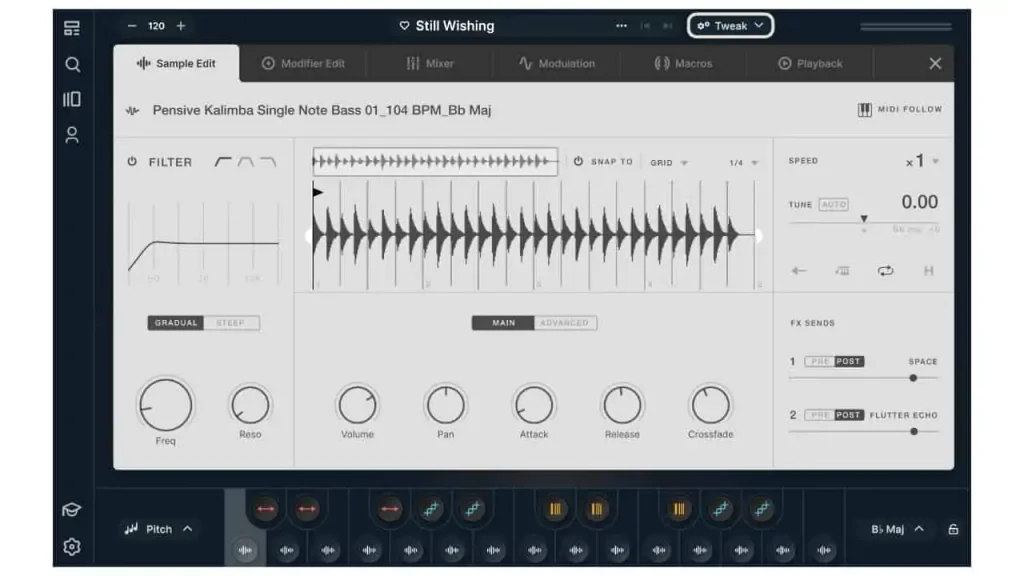
To fine-tune a sample, go to the Sample Edit page by selecting “…” → “Edit” on a white key or “Tweak” → “Sample Edit” on the top menu.
FILTER: The filter, which can be turned on and off with the power button, has three types of high-pass, low-pass, and band-pass, each with “GRADUAL” and “STEEP” options, for a total of six types. You can adjust the “Freq” (cutoff frequency) and “Reso” (resonance).
In the middle, there is a sample waveform, and you can set the start and end positions by dragging left and right.
When looped:
- The start of the sample is indicated by a black vertical line
- The start and end of the loop are indicated by a white vertical line.
You can use “GRID” in the upper right to create a grid that matches the rhythm or “TRANSIENT” to create a grid that matches the waveform. Pressing “SNAP TO” will fix the start and end positions to the grid.
SPEED: You can adjust the speed to 1/4, 1/2, ×1, or ×2.
TUNE: You can adjust the pitch from -24 to +24. There is an AUTO button that automatically adjusts the pitch to the key set in the A Play screen.
Below that are four icon marks.
From left to right:
- Reverse
- Foldback (in normal play, foldback with reverse)
- Loop
- Hold (playback is maintained even when the key is released).
FX SENDS: The amount of effect pre/post-send.
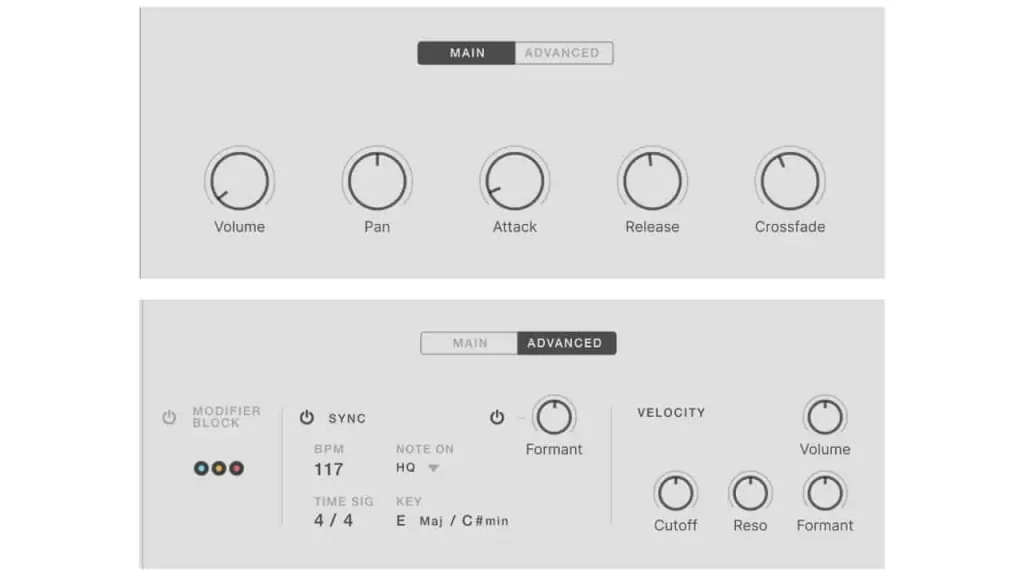
MAIN
In the MAIN area, you can adjust the following basic settings:
- Volume: Adjust the volume.
- Pan: Adjust the left-right panning.
- Attack: Adjust the attack.
- Release: Adjust the release.
- Crosfade: Apply a fade to the start and end positions of the loop to prevent attack noise.
ADVANCED
MODIFIER BLOCK: When turned on, the black keys’ effects will not be applied.
SYNC: When turned on, it plays back in sync with the DAW tempo. Note that the BPM and KEY settings in the SYNC area are related to the loop, and cannot be adjusted for loops that were not created by the user.
FORMANT: When turned on, the formant filter that changes the timbre can be adjusted.
VELOCITY SENSITIVITY: You can control the amount by which four parameters change depending on velocity.
Mixer
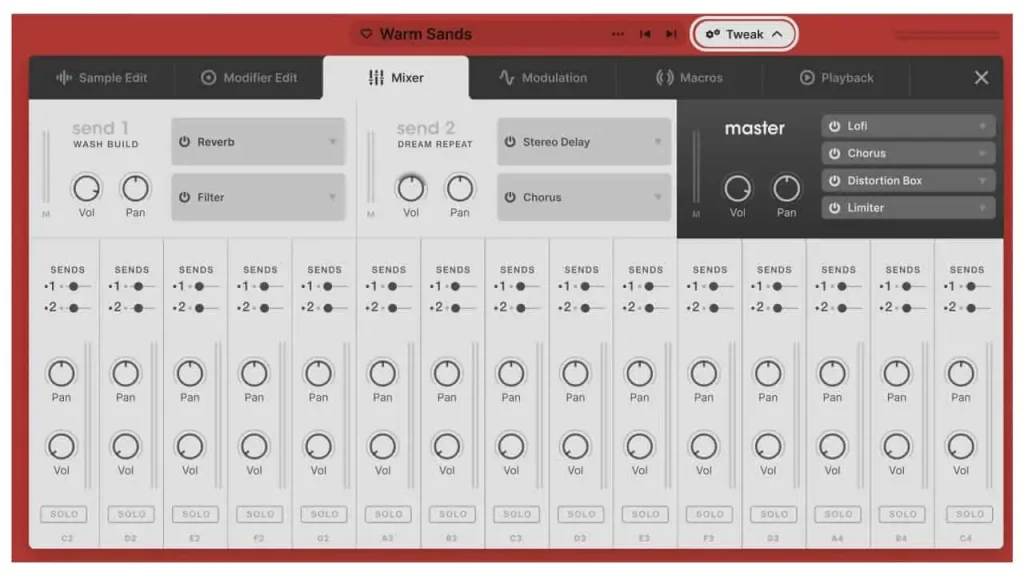
You can display the mixer screen by selecting “Tweak” → “Mixer” in the upper section. The volume (Vol) and panning (Pan) of each of the 15 loops can be adjusted. You can also set the SEND 1, SEND 2, and MASTER effects here. Two effects can be set for SEND 1 and SEND 2 each, and four effects can be set for MASTER. The parameters of each effect are displayed at the bottom when selected. You can change the effects from the right arrow at the end of each effect.
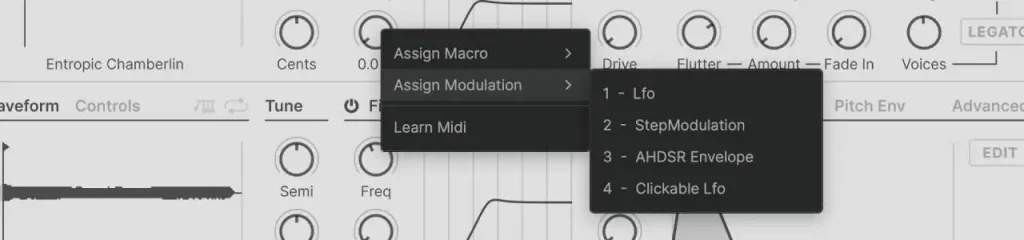
Macros
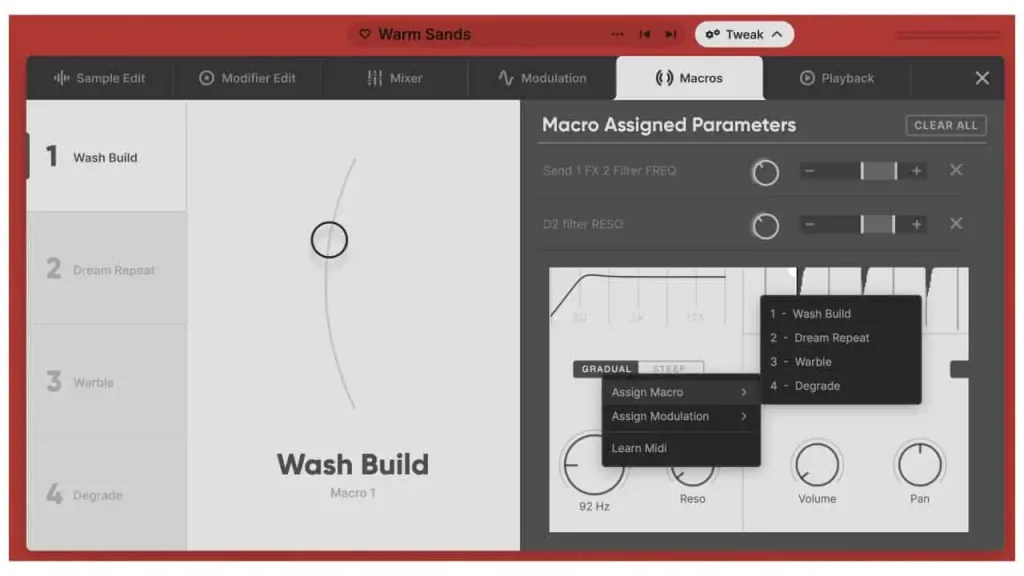
You can set the macro control by selecting “Tweak” → “Macros” in the upper section. Macro controls are the four rounded faders on the play screen. These four effects are not the original effects, but created and set effects. You can assign parameters such as mixer effects and sample settings by right-clicking and selecting “Assign Macro.” You can control them together using the assigned macros. You can set the reference value with a knob and adjust the range of change by dragging it within the ± range.
Modulation
You can display the modulation screen by selecting “Tweak” -> “Modulation” at the top.
Like the macro control, you can assign parameters by right-clicking on them and selecting “Assign Modulation.”
There are two types of modulation: LFO and Step Modulation (Sequencer). Each can be turned on and off with the power button, and you can also switch between LFO and Sequencer by clicking on the name part. You can select presets from the “…” menu.
LFO
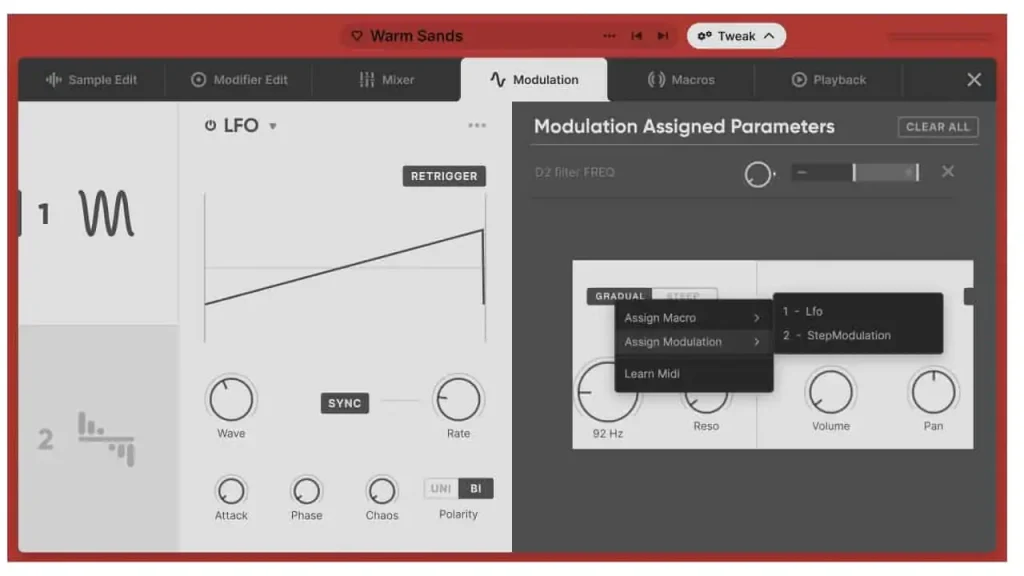
Wave: You can set the waveform of the LFO.
Rate: You can adjust the speed of the LFO. You can adjust it to the tempo of the DAW with the SYNC button.
Attack: You can adjust the fade-in amount until the LFO reaches its maximum amplitude.
Phase: You can adjust the starting phase of the LFO.
Chaos: Apply a random value to the cycle of the LFO.
Polarity: You can set the LFO on the Y-axis to “Uni” or “Bi” offset.
Step Modulation (Sequencer)
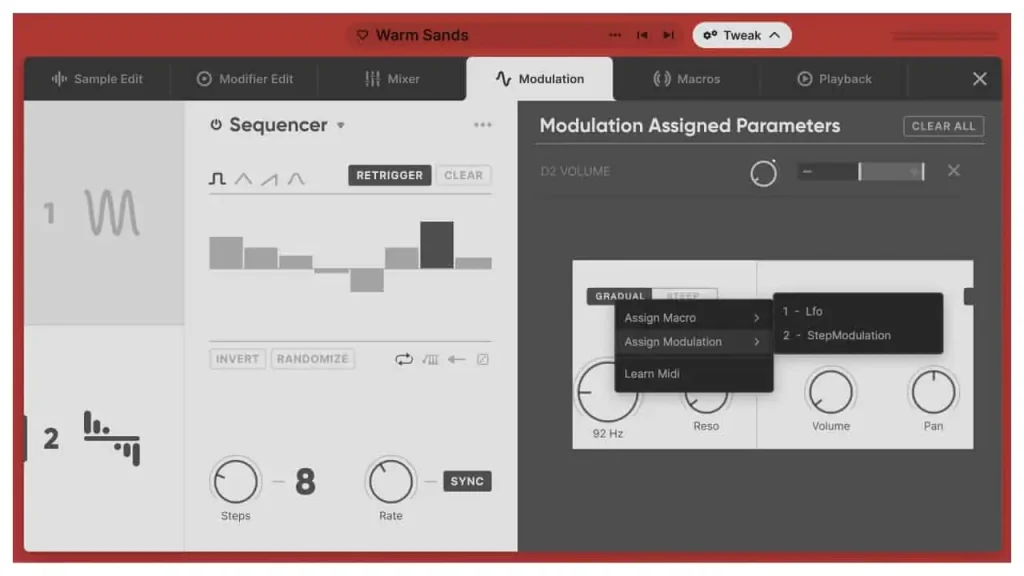
You can adjust the value of each step by dragging it up and down. At the top of the step editor, there is a shape selector, which allows you to select individual envelopes for each step.
Steps: You can select the number of steps in the sequence from 1 to 32.
Rate: You can adjust the speed. You can adjust it to the tempo of the DAW with the SYNC button.
INVERT: Apply the opposite value to each step.
RANDOMIZE: Apply a random value to each step.
CLEAR: Clear all values.
The icons at the bottom right of the step editor are, from left to right:
- Normal loop
- Fold back (fold back with reverse)
- Reverse the playback direction
- Play steps in random order
Modifier Edit
Next, let’s explain each of the effects for the black keys. There are three types of effects for the black keys:
- Playhead
- Repeater
- Resequence
Each plays a white key sample and is affected when pressed.
Like the white keys, you can select “Edit” or “Hold” by selecting “…” with the cursor. You can also edit them from “Tweak” -> “Modifier Edit” at the top.
You can select one of the three Modifier Edits by selecting the name part on the top right.
Playhead
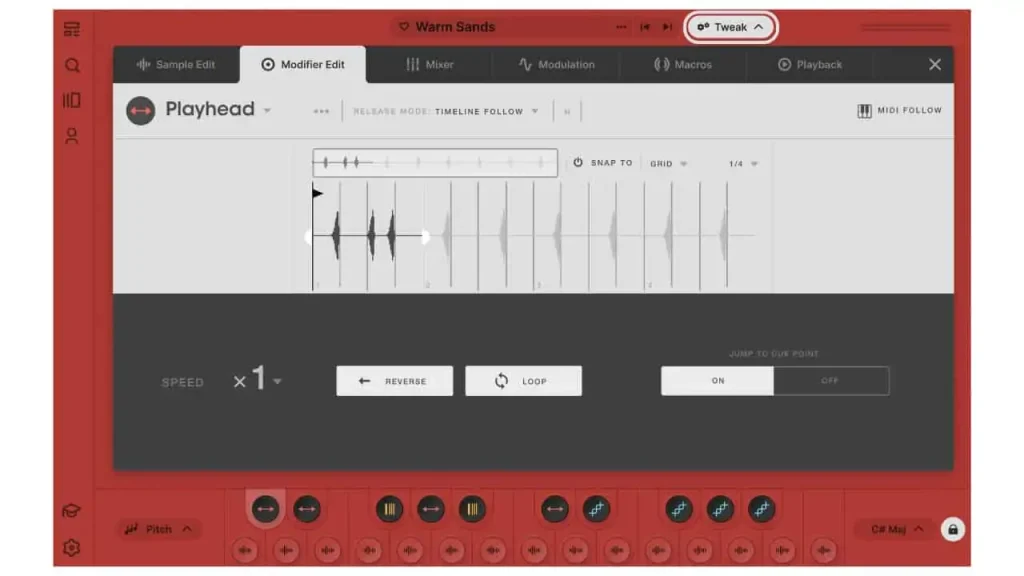
This is the simplest effect among the black key effects, and you can set the playback position, “LOOP,” “REVERSE,” and “SPEED” just like in Sample Edit. When “JUMP TO CUE POINT” is turned on, the loop that started will return to the beginning position of the Playhead.
Repeater

This is an effect that repeats as the name suggests.
REPEAT RATE: You can adjust the speed of the repeat.
GRID SYNC: When the power button is turned on, you can set the grid position at which the repeat effect occurs. If the GRID SYNC is a large frame such as 1BAR, it will not repeat until it reaches the point.
STEP SEQUENCER: You can repeat even when it is off, but by setting it, you can add volume expression to the repeat.
STEPS: You can set the number of steps in the STEP SEQUENCER.
PATTERN REVERSE: The entire pattern is reversed.
INVEST STEPS: The entire value is reversed.
RANDOMIZE: It becomes a random value.
CLEAR: All patterns are cleared.
Resequence
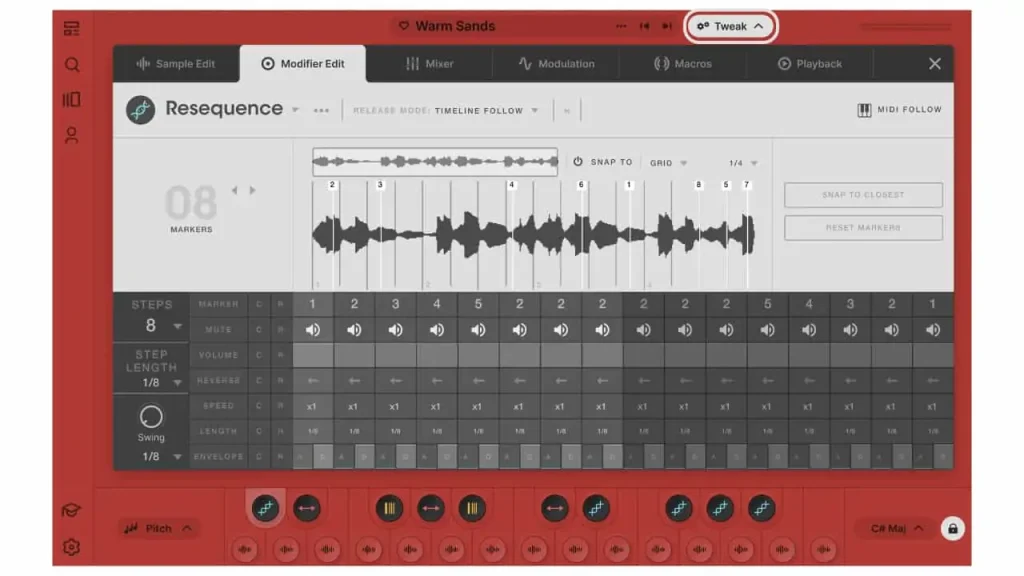
This is the effect I personally recommend the most.
You can set multiple starting positions (MARKER) and play them like a step sequencer from that position.
You can make the following settings for each MARKER:
- MUTE
- VOLUME
- REVERSE
- SPEED
- LENGTH
- ENVELOPE: Attack (A), Decay (D)
You can adjust the number of steps in the entire sequence with STEPS.
You can adjust the length of the entire step with STEP LENGTH.
You can adjust the swing amount with SWING.
The marker will move to the closest position on the grid with SNAP TO CLOSEST.
Playback
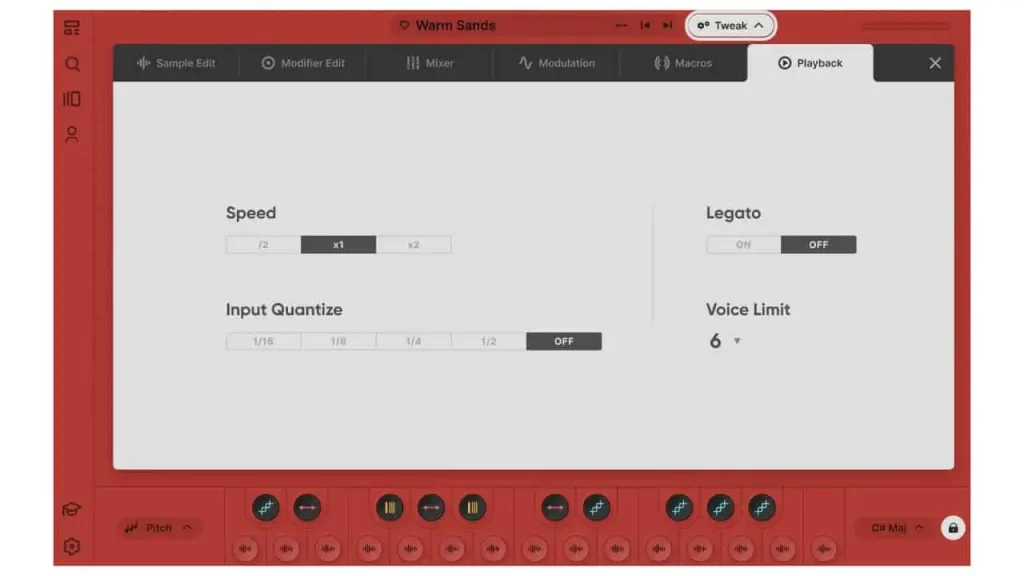
You can make global settings from “Tweak” → “Playback” in the upper section.
Speed: It affects the global playback speed.
Legato: If it is turned on, continuously triggered samples will not be retriggered.
Voice Limit: You can set the maximum number of samples that can be played at once in the kit.
Input Quantize: It is only accessible in plug-in mode and is not displayed when using Arcade as a standalone application. The sample starts at the beat set by quantization.
Note Kits
Layer Edit
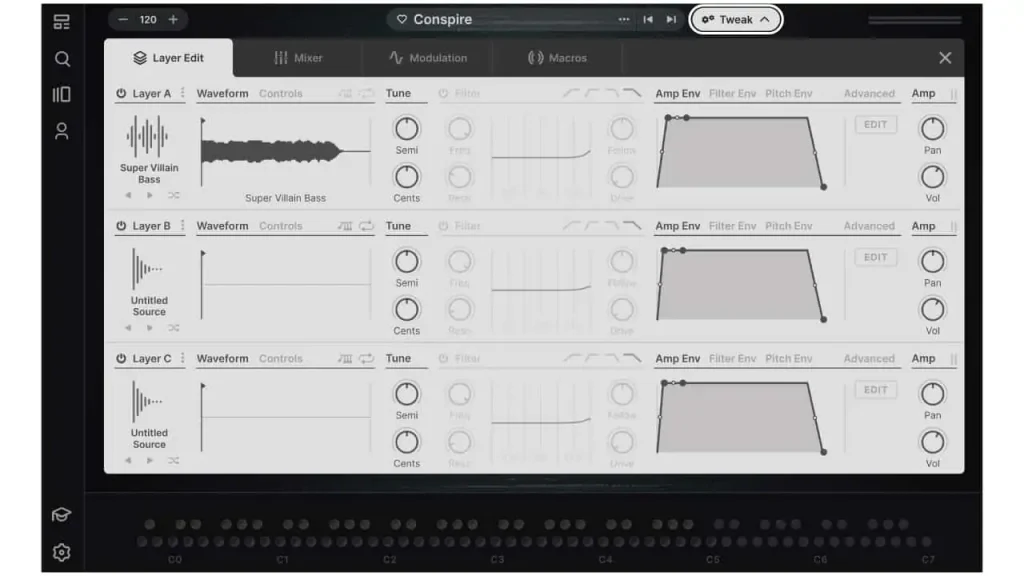
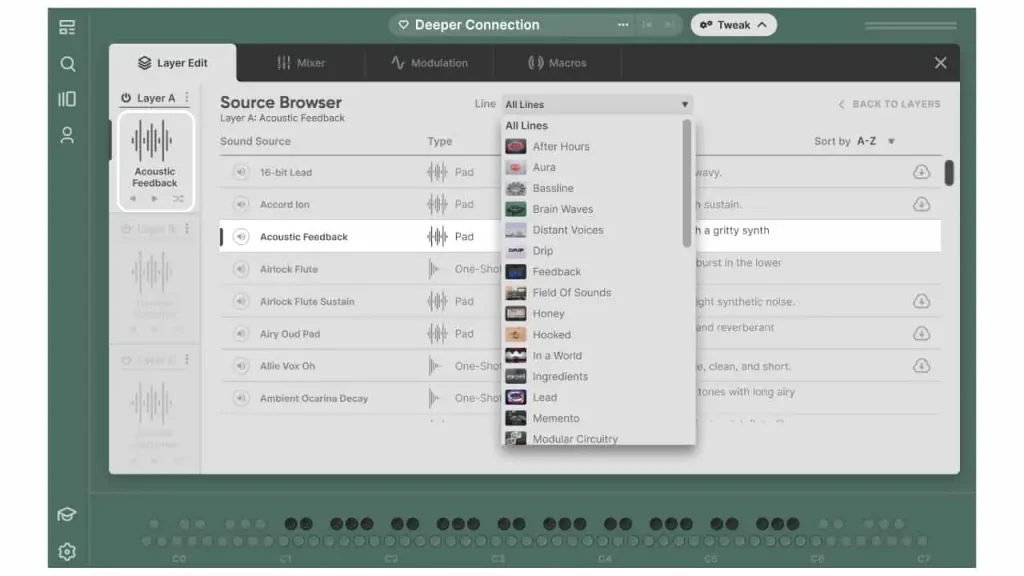
When you open the Note Kit, you can adjust various settings from the “Tweak” menu in the upper right, just like with a Sampler Kit. You can edit three layers from “Layer Edit.” Each layer can be turned on and off with the power button, and you can select the source from the source browser by selecting a waveform. You can also download and use cloud-marked waveforms. It is also possible to display the source for each line from the top menu. Click “BACK TO LAYERS” to return to Layer Edit. You can also change the waveforms with the arrow below, and use the crossed arrow mark to randomly change the sources.
Waveform

You can adjust the start position of the waveform by dragging the black vertical line to the left or right, just like with samples. The two marks in the upper right are for reversing and looping.
Controls

When you switch to the Controls screen from the Waveform screen, you’ll see several knobs. “Sample Start” allows you to change the start position of the sample. This is linked to the black vertical line on the waveform. You can set up round-robin sampling with “RR,” which changes the sample when you play the same note multiple times. You can select the number of round-robin samples with “RR Amount,” reset the round-robin with “RR RESET,” and randomly change the round-robin with “RR RANDOM.” You can adjust the start and end points of the loop with “Loop.” This is also linked to the white vertical line on the waveform. You can adjust the crossfade (fade-in + fade-out) of the repeating loop in milliseconds with “X-fade.” The loop won’t work unless you turn on the loop mark in the upper right.
Tune / Filter

You can adjust the pitch in semitones or cents with “Tune.” The filter can be turned on and off with the power button. In addition to the cutoff frequency and resonance, you can control distortion with “Drive” and follow the keyboard’s playing position with “Follow.”
Envelope
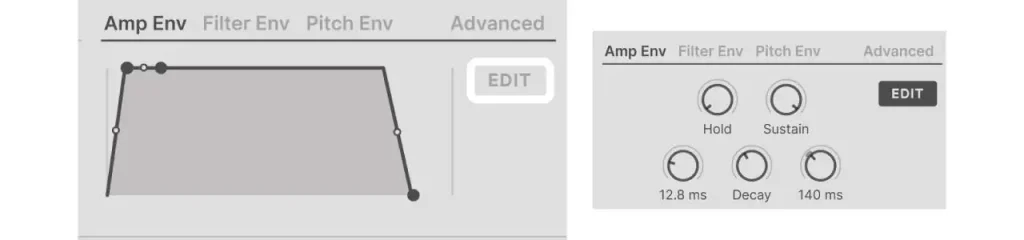
You can freely adjust the amp envelope by dragging the points or lines. You can also use the “EDIT” button to adjust the attack, hold, decay, sustain, and release with knobs. You can also apply an envelope to the filter with “Filter Env” and to the pitch with “Pitch Env.”
Advanced

You can adjust the glide time of the keys with “Glide.” “Flutter” is an effect that adds pitch fluctuations. You can adjust the amount with “Amount” and the fade-in until the effect is fully applied with “Fade In.” You can adjust the number of voices with “Voices,” and the amount of change due to velocity with “Velocity.” You can adjust the range of keys played by the layers by dragging them up and down. Changing the “Color” next to it will also change the range. Color refers to the slight difference in tone for the same note in the same position. The sample used as a reference is probably changing along with the range.
Amp

You can adjust the left-right panning with “Pan” and the volume of each layer with “Vol.”
Mixer
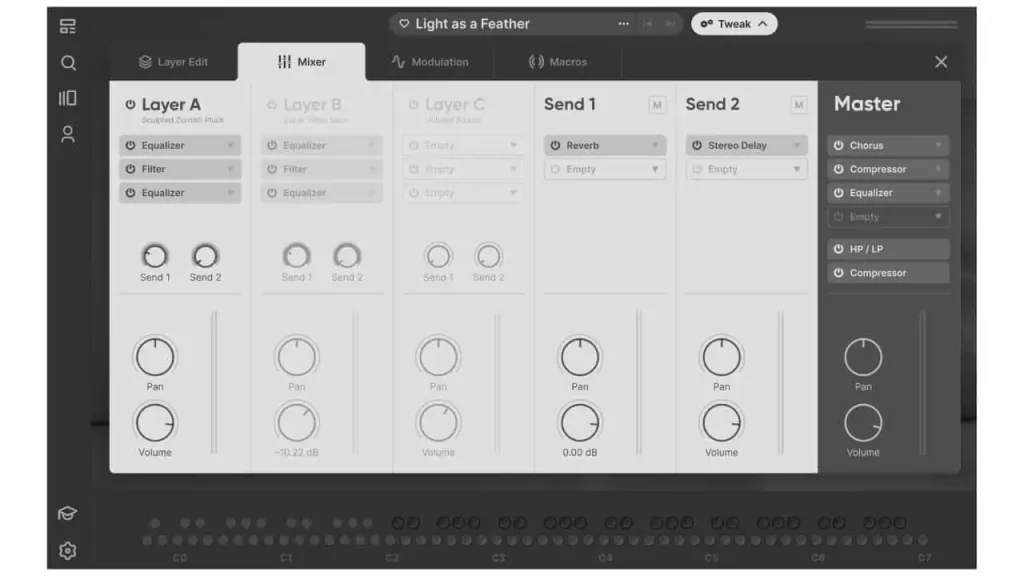
The mixer for each layer in the Note Kit can have three effects applied. Each effect can be turned on/off by its power button, and selected from the dropdown menu. Clicking on the effect name displays the detailed parameters at the bottom. The effects can also be reordered by drag and drop.
Each layer can adjust its send level, panning, and volume, which are linked to the parameters in the Amp section of the Layer Edit page. Send 1/2 can select two effects and mute from “M.”
In the Master section, four additional effects can be selected, in addition to the fixed effects “HP/LP” and “Compressor.”
Modulation
In addition to the LFO and Sequencer, the Note Kit’s modulation features include “Envelope” and “Custom LFO.”
For information on how to modulate, refer to the article above. Modulation parameters can be assigned from “Assign Modulation” after right-clicking the parameter.
Envelope
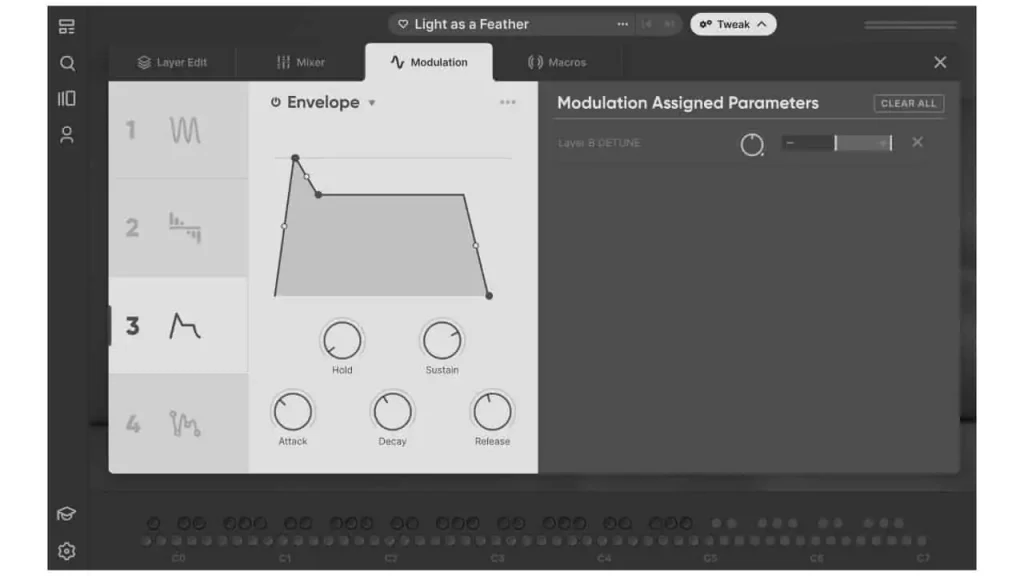
The Envelope can be adjusted by drag and drop or by knob, just like the Envelope in the Layer Edit section.
Custom LFO
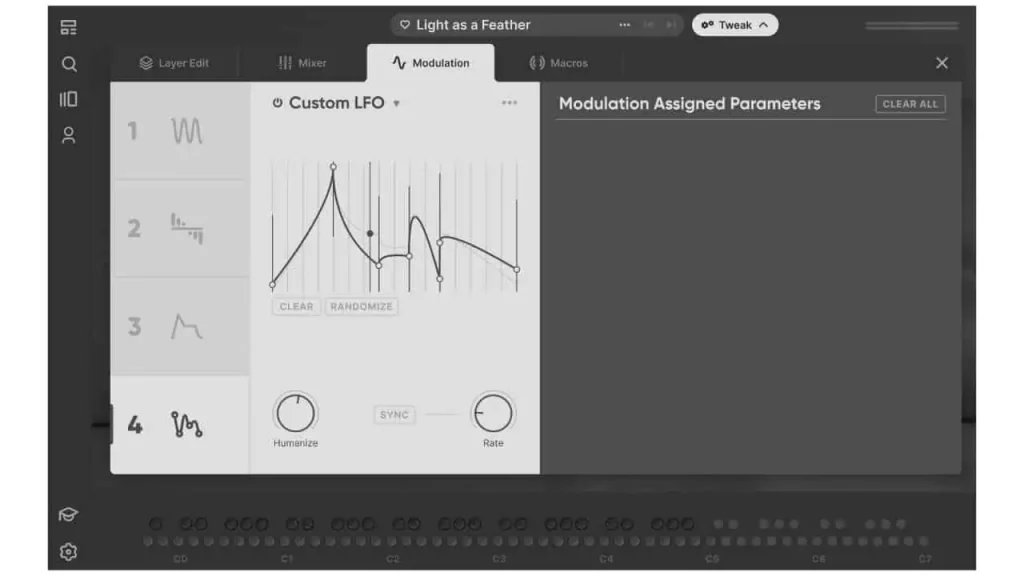
Custom LFO allows users to create new points with a double-click, and customize them by drag and drop.
CLEAR clears the LFO.
RANDOMIZE creates a random LFO.
Humanize creates variation in the value range of the LFO to make it more human-like.
Rate adjusts the speed of the LFO, and can be synced to the DAW tempo by selecting “SYNC.”
How to add your own samples
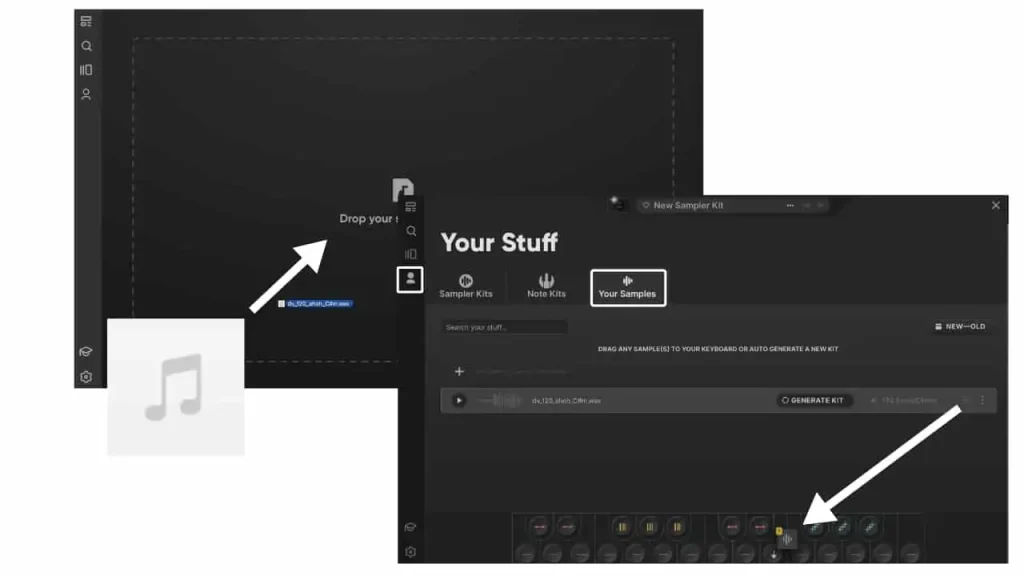
Users can simply drag and drop their own samples into Arcade, either as a standalone application or a plugin. After dropping, users can select their samples from “Your Stuff” → “Your Samples” on the upper left, and drag and drop them onto the keyboard or create a kit from a single sample by selecting “GENERATE KIT” with the cursor over the sample.
Summary
Arcade is a software that allows you to control loops assigned to keys and pads, making it intuitive to use even for those who can’t play instruments or understand music theory. It not only provides access to samples, but also supports their effective use. This software is fun and easy to use, so we recommend trying the 30-day free trial. We hope this article has been helpful.