
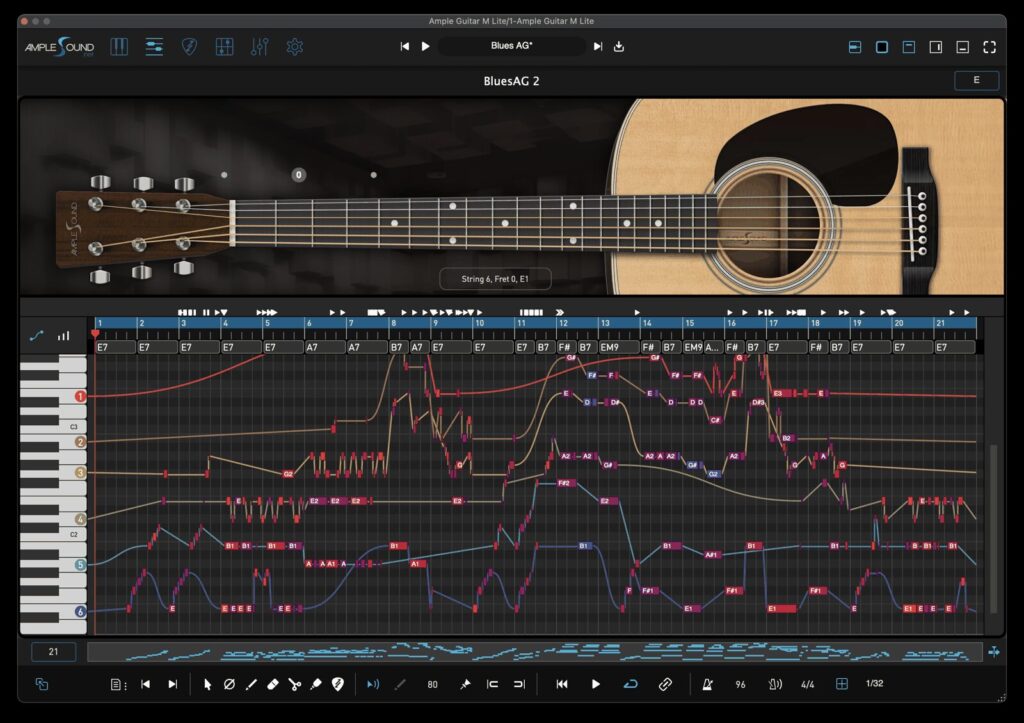
Ample Sound, a developer known for its extensive line of guitar and bass instruments, offers a free acoustic guitar library called Ample Guitar M Lite. It has now received a major update as Ample Guitar M Lite 4 (AGML4), adding the new Riffer 4 MIDI editor and a completely redesigned strumming and chord system. The result is a level of quality that is hard to believe is available for free.
In this article we look at what Ample Guitar M Lite 4 is, how it differs from the paid version, and how to actually use it.
1. What is Ample Sound Ample Guitar M Lite 4?
Ample Guitar M Lite 4 (AGML4) is a free acoustic guitar instrument from Ample Sound, modeled on a Martin D-41 Acoustic Guitar. It runs as a VST2, VST3, AU and AAX plugin inside your DAW, and can also be used on its own through Ample Sound’s standalone host, Rectangles.
| Item | Details |
|---|---|
| Developer | Ample Sound |
| Price (list) | Free (paid Ample Guitar M: $169) |
| Content | Fingerstyle 1 library (877MB / 16-bit) |
| Range | E1–C5 (drop tuning supported, down to D1) |
| Formats | VST2 / VST3 / AU / AAX / Standalone (Rectangles) |
| System | macOS 10.15 or later / Windows 7–11 (64-bit) |
Main upgrades in version 4
- New Riffer 4 MIDI editor: create guitar phrases while switching between piano roll and tablature in real time
- Completely new strumming and chord system: the new Strum Note treats multiple sub-notes inside a chord as a single editable object
- String visualization system: strings are displayed on the piano roll, preventing simultaneous notes on the same string while automatically assigning fingering
- Tab Reader 4: supports tablature files from GP3 through Guitar Pro 8
- Polyphonic Legato & Slide Smoother: natural legato at any interval and any speed
2. Differences from the paid version and what to know before you use it
Ample Guitar M Lite 4 is distributed free of charge as the lite edition of the paid Ample Guitar M. The differences are as follows.
| Ample Guitar M (paid) | Ample Guitar M Lite 4 (free) | |
|---|---|---|
| Price | $169 | Free |
| Size / audio quality | 7.8GB / 24-bit | 877MB / 16-bit |
| Included libraries | Fingerstyle + Strum + Pick | Fingerstyle only |
| Sampling method | Every string and every fret sampled individually | Sampled per pitch (the same pitch on a different string shares one sample) |
| Articulations | 8 | 5 |
| Riffer 4 | Full features + all riff libraries | All editing features (limited presets, up to 64 bars) |
The five articulations available in the free version are:
- Sustain
- Pop (accent)
- Hammer-on & Pull-off
- Legato Slide
- Palm Mute
The paid version adds Natural Harmonics, Slide In & Slide Out and Slide Guitar for a total of eight. For ordinary acoustic backing parts or arpeggio programming, the free version already covers most of what you need.
Things to know before you start
- The only included library is Fingerstyle: the Strum and Pick libraries found in the paid version are not included in the free version (the Strummer feature itself does work in the free version).
- Natural Harmonics, Slide In & Out and Slide Guitar are not supported: if you need those techniques, you will need the paid version.
- Audio quality and sample count are simplified: recorded at 16-bit, and the same pitch on different strings shares a single sample.
- Riffer 4 is limited to 64 bars: the number of riff library presets is also limited (the editing features themselves are fully available).
Because the free version uses the same engine as the paid one, the key switches assigned to the paid-only articulations (Natural Harmonics, Slide In & Out, Slide Guitar) have no matching samples in the free version. Just like Ample Bass P Lite, some key switches simply will not respond — this is not a bug.
3. A quick guide to the basics
From here we walk through the basics of Ample Guitar M Lite 4 screen by screen. The six icons in the top left switch between Main (instrument), Riffer (MIDI editor), Strummer, Tab Reader, Effects and Settings. Hovering the cursor over any button or knob shows a tooltip explaining what it does, so hover first whenever you are unsure. This is not an exhaustive manual, so for finer details please also refer to the manual page on the official site.
Main screen
The distinctive thing about the main screen is that the guitar body itself is the control panel — you click and drag directly on it as if you were handling a real guitar.
- Tuning (pegs): drag the pegs on the headstock to lower each string by up to two semitones. Dropping the 6th string (E1) by two semitones gives you Drop D. The D1 low note listed in the specs refers to this state.
- String / fret display: the readout under the neck (for example String 5, Fret 8, F2) shows the sounding string, fret and note name in real time.
- Articulation buttons: the four buttons at the bottom left — ● sustain & pop (accent), ⏸ palm mute, > legato slide, ◀▶ hammer-on & pull-off — switch the current playing technique (linked to key switches C0–F0). The two greyed-out slots above are for the paid version and cannot be used here.
- Sound mode: the icon to the left of the BODY slider switches between Mono, MS1, MS2 and AB (MS1 is the default).
- Volume sliders: BODY (middle mic), ST (side mic), MASTER, PAN, REL (release sound), FX (FX sound) and FSA / FSR (fingering noise — FSA is the finger touching the string, FSR is the finger leaving it) can all be adjusted individually.
- DOUBLE: a doubling feature where two guitars on the left and right each play different samples. The knob sets the stereo width between them, and the power switch next to it toggles it on and off.
- RES / RES.TIME: adjusts the gain and release time of the resonance that is essential to a convincing acoustic guitar tone.
- The four buttons on the right: top left is the play mode switch, top right is open string first, bottom left is the auto legato switch, and bottom right toggles stroke noise (each mode is explained below).
- Virtual keyboard: the colour-coded zones on the keyboard at the bottom correspond to the key switches.
About the play modes
- Instrument mode: applies the same restrictions as a real guitar, such as not letting two notes sound on the same string at once. Choose this when realistic behaviour matters most.
- Keyboard mode: lets you play freely without the constraints of a real instrument. Handy when you want to program parts like a keyboard player.
- Solo mode: monophonic playback only. Note that auto legato is disabled in both keyboard mode and solo mode.
- Power chord (5th) mode: sounds the root and the fifth together.
- Octave mode: sounds the root and the octave above together.
- Auto legato mode: switches between auto slide, auto hammer-on & pull-off, and off. It can also be toggled with key switch D#6, where high velocity selects auto slide and low velocity selects auto hammer-on & pull-off. The button icon changes with the selected mode.
- Open string first: when enabled, the six notes E1, A1, D2, G2, B2 and E3 sound as open strings. Key switch G#6 toggles it as well, with high velocity turning it on and low velocity turning it off.
- Stroke noise: strummed noise is generated automatically for polyphonic material.
- Vibrato: auto vibrato mode is the default. Vibrato depth, speed and similar parameters are adjusted in Settings, and setting the vibrato depth to 0.75 or higher also triggers vibrato noise.
- HOLD PEDAL: when enabled, notes sustain instead of stopping.
Articulations and key switches
| Articulation | Key switch | Details |
|---|---|---|
| Sustain & Pop (accent) | C0 | The basic fingerstyle tone. Very high velocities trigger the pop (accent) variant (playable range E1–C5). |
| Palm Mute | D0 | A muted tone useful for chugging rhythm parts. The lower the velocity, the deeper the mute (playable range E1–C5). |
| Legato Slide | E0 | Hold E0 and enter two overlapping notes on the same string to connect them with a slide. After the slide it returns automatically to the previous articulation. For slides of two frets or more, a faster velocity on the destination note produces a faster slide (Slide Smoother). Pressing E0 with high velocity also changes the position (playable range F1–C5). |
| Hammer-on & Pull-off | F0 | Hold F0 and enter two overlapping notes on the same string to connect them smoothly. It returns automatically to the previous articulation afterwards, and pressing F0 with high velocity also changes the position (playable range E1–C5). |
As an extra note, pressing C0 and D0 together enables a mixed mode where velocity selects the technique: high velocity gives sustain, low velocity gives palm mute. Legato slide and hammer-on & pull-off also support Poly Legato — while a chord is sounding, playing only the highest or lowest note of the target chord makes every sounding note glide by the same interval.
Ample Sound also points this out in the manual: if you find articulations and legato hard to control, it is easier to program the part in Riffer 4 and drag it into your DAW than to memorise all the key switches.
FX sounds and handy key switches
Besides articulations, a number of FX sounds for extra realism and several convenience functions are mapped to key switches.
| Key switch | Details |
|---|---|
| F5 / F#5 | Scratch / Slap |
| G5 / G#5 | Mute / Strum mute |
| A5 / A#5 | Down stroke noise 1 / Up stroke noise 1 |
| B5 / C6 | Down stroke noise 2 / Up stroke noise 2 |
| F6 / F#6 / G6 | Hit top (open) / Hit top (muted) / Hit rim |
| G0–C1 | Specifies which string is played (G0–C1 correspond to strings 6 through 1). Pressing with high velocity also affects the fret position; low velocity does not. |
| C#1 → E1–G#2 | Manual fret position switching. Press C#1 to show a yellow line, then press a key between E1 and G#2 to move to that position. |
| G#6 / D#6 | Open string first (high = on / low = off) / Auto legato mode switch (high = auto slide / low = auto hammer-on & pull-off) |
| D6 | Repeats the currently playing note (multiple notes supported) |
Note again that the key switches for the paid-only articulations — Natural Harmonics (C#0), Slide In & Slide Out (D#0) and Slide Guitar (F#0) — have no matching samples in the free version.
Riffer 4 (MIDI editor) screen
The headline feature of this update is Riffer 4, a MIDI editor designed specifically for plucked string instruments. Its main capabilities are as follows.
- Dual view: edit while switching between piano roll and tablature in real time. Keyboard players and guitarists can each work in whichever view suits them.
- String visualization system: strings appear on the piano roll, simultaneous notes on the same string are prevented automatically, and fingering is assigned for you. Because the resulting MIDI is actually playable on a real guitar, parts sound far less programmed.
- Strumming and chord system (Strum Note): multiple sub-notes within a chord are treated as a single editable object, letting you control strum time, velocity gradient and legato parameters together.
- Full MIDI import and export: import external MIDI or export phrases built in Riffer to your DAW, with playback matching in both directions.
- Direct technique editing: fingering, articulation, legato and expression can be set per note, so there is no need to program fiddly key switches or MIDI CC.
- New MIDI CC / velocity editor: display and edit several CC lanes at once with colour coding and adjustable transparency, plus one-click curve presets.
- Riff library: load guitar riff presets and use them as they are, or edit them into your own phrases (the free version limits the number of riffs and caps length at 64 bars).
The six icons in the top right of the Riffer panel
These are not obvious at first glance. Six icons sit at the top right of the Riffer panel and, from left to right, they are: piano roll / tablature toggle, colour theme, instrument panel display, right sidebar display, CC panel display, and panel resize. The piano roll to tablature switch is the leftmost button.
As for reading the screen, the strip under the bar ruler is the chord track (double-click to add a chord, double-click a chord to edit it), and the area below it is the note editor. Along the left edge are the six strings E3 / B2 / G2 / D2 / A1 / E1, colour-coded with dots; clicking a dot selects every note on that string. At the bottom of the screen is a CC editor (toggled with the eye icon) that overlays velocity and MOD lanes (Bend / 1.Mod / Velocity / 64.Hold / 7.Volume) in different colours, plus an FX lane for one-shot sounds such as scratches. The right sidebar holds the edit history along with MIDI processing tools including Dice (automatic phrase generation), MIDI humanize, time stretch and quantize swing.
The basics of editing: select a note, then use the property bar
This is the point most people stumble on first in Riffer: you change playing techniques not from a right-click menu, but from the dropdowns in the property bar that appears at the top of the screen once a note is selected.
- Articulation: choose from Sustain (C0), Pop (C0) or Palm Mute (D0). Paid-only techniques such as Natural Harmonic (C#0), Slide In (D#0) and Slide Guitar also appear in the list, but they are greyed out and cannot be selected.
- Legato: slides and hammers are not set in the articulation field but in the legato field next to it, choosing between No Legato, Legato Slide and Legato HP.
- String: a dropdown from 1 to 6 changes which string is played.
- Other: start position, end position, pitch, note-on velocity and note-off velocity can all be entered numerically in the same bar.
Chord edit dialog
One area unique to a guitar instrument: double-clicking a chord in the chord track opens a dedicated chord editing dialog, where you build a chord from five columns.
- Root: the root note (C to B)
- Type: chord type (Maj / min / sus2 / sus4 / aug / dim / 5 / oct / user)
- Extension: tensions (7 / Maj7 / add9 / 6)
- Alteration: altered tones (b5 / b9 / 9 / #9 / 11 / add11 / add#11 / add13)
- Bass: the bass note, used when creating slash chords
The fretboard diagram at the top of the dialog shows the actual voicing, and the numbers 1, 2, 3 and so on in the top right switch between voicings in different positions. Transpose at the bottom shifts the whole chord, and the finished chord is displayed with its chord name and constituent notes, for example Aadd9 (A1 C#3 B2 E3). Tensions that do not work with the chosen chord type are greyed out, so you can only build chords that actually make sense.
Strum Note operations
Right-clicking a note gives you the usual editing commands such as copy, delete and quantize, plus two guitar-specific entries: Ungroup Strum (breaks the strum group back into individual notes) and Sync the Strum and the associated chord. Use these when you want to fine-tune a strum created with Strum Note, or to make the strum follow along after editing the chord track.
Saving and loading riffs and MIDI input/output are collected in the file menu (the document icon) at the bottom left of Riffer. Alongside New, Load, Save and Save As there are Import MIDI, Export MIDI and Export Audio, so you can bounce phrases you have built as audio files as well as MIDI. Exporting to your DAW is done by dragging and dropping from the Drag MIDI to Host icon.
Strummer screen
Strummer lets you build backing parts using chords you have defined together with a sequencer. Everything — chord setup, sequencer programming and the various parameters — sits on a single screen. Use the power button at the bottom left, or key switch C#6, to turn it on and off.
- STRUM TIME: the time between the onset of the first sub-note in a chord and the onset of the last. It can also be controlled with key switch C#5, where higher velocity shortens the strum time. The grid button next to it toggles Each / All: with a strum time of 1000ms, Each gives 1000ms between every note in the chord, while All spreads 1000ms across the whole chord.
- RELEASE: the curve icon next to it switches between two ADSRs — Body Resonance, which reproduces an open ringing strum, and Mute Depth, which reproduces a muted one.
- STOKE VOLUME: adjusts the level of the stroke noise.
- TIME / SEPARATION / VELOCITY: three humanize knobs. TIME (ms) randomises the overall strum length, SEPARATION (%) shifts note timing while preserving the total strum time, and VELOCITY varies the velocity of individual notes.
- HUMANIZATION / QUANTIZE / SIGNATURE: the three knobs on the right of the screen. HUMANIZATION (ticks) randomises the sequencer timing, QUANTIZE sets the grid (1/16 and so on), and SIGNATURE sets the time signature.
Setting up chords (Select / Detect)
There are two ways to specify chords, Select and Detect, switched with the buttons at the bottom of the screen or with key switch D5 (velocity 1–63 = Select, 64–127 = Detect).
Select mode provides 24 chord slots, offering 540 variations from combinations of root note, chord type and position. The keys C1 to B2 map to slots 1 through 24, so the chord in the slot sounds when you press the corresponding key. Each slot is edited through three fields — Root Note, Chord Type and Position — and the voicing of the chosen chord appears on the fretboard diagram next to it. The slot display toggles between 1-12 and 13-24 at the bottom, and the whole chord bank can be transposed, saved and loaded.
Detect mode automatically detects chords you play in the C1 to B2 range and switches to the matching preset (root notes are taken from C1 to B1). Inversions are supported, and detected chords are shown across five fields — Root Note, Chord Type, Bass Note, Treble Note and Position — alongside a fretboard diagram. Playing a single note in C1–B1 or C2–B2 on its own creates a slash chord.
Sequencer (SEQ)
This is the section where you build backing patterns. Down the left edge of the grid are stroke symbols for down strokes, up strokes, mutes and so on, together with string numbers 1 to 6, making 14 strum note rows in total. You place notes on these rows to assemble a rhythm, and combined with velocity you can call on 28 different playing variations.
You can create up to eight sequences, switched with the 1–8 buttons on the right of the screen or with the key switches C3 / C#3 / D#3 / F#3 / G#3 / A#3 / C#4 / D#4. The information display in the top right shows the selected sequence number, time signature, grid and tempo.
The bar at the bottom of the screen handles saving and loading patterns, stepping between patterns, playback, dragging and dropping to the host, and conversion to Riffer. Converting to Riffer lets you edit the phrase in much finer detail.
Note that while strumming, key switch E0 enables legato slide and F0 enables hammer-on & pull-off.
Tab Reader 4
This feature loads, displays and plays Guitar Pro tablature files, supporting formats from GP3 through Guitar Pro 8. Be aware that files created in third-party tab editors other than Guitar Pro are not supported.
Loaded tablature plays back with the play button, and enabling the loop toggle restarts from the beginning after reaching the end. Turn on host sync and it will follow your DAW’s transport. If you edit the file externally, you only need to press Refresh — there is no need to reload it. For files containing multiple tracks, use the track selector in the bottom bar to choose which track to load. There are also two humanize knobs at the bottom for randomising timing (ticks) and velocity.
Loaded tracks can additionally be imported into Riffer while retaining their fingering, articulation and expression data.
Effects (FX screen)
On the FX screen, the four icons down the left side switch between:
- Compressor
- 8-band EQ
- Delay (with tempo sync)
- Convolution reverb (choose Room / Small Hall / Hall / Large Hall IRs and adjust with Size / Pre Delay / Bass / Treble)
Each effect has its own power button and presets, so you can get a good way towards a finished tone inside the plugin without adding separate effects in your DAW.
Settings worth knowing
The Settings page opened from the gear icon has a lot of entries, but these are the ones worth knowing about.
- Auto Mod (automatic vibrato): tick the box in the Modulation section and vibrato is applied to your playing automatically. Mod Time, Mod Gain, Mod Pitch and the curve let you shape the movement in detail, and you can use it alongside manual vibrato from the mod wheel.
- Bend Range: sets the pitch bend range (two semitones by default).
- Velocity Sens: the Velocity Sens control in the MIDI tab adjusts velocity sensitivity. Useful for matching the response to the touch of your own MIDI keyboard.
- Other: master tuning (440Hz) and maximum polyphony, along with UI language, scaling and tooltip on/off settings.
Conclusion
With version 4 bringing phrase creation via Riffer 4 and an entirely new strumming and chord system into the free edition, Ample Guitar M Lite 4 now stands a clear step ahead of other free acoustic guitar instruments. If you eventually need pick playing or the strum library, you can upgrade to the paid Ample Guitar M — making this an instrument you can stay with for a long time.
It is also a sensible starting point if you are considering any of Ample Sound’s guitar instruments, since you can try out the specification and workflow with Ample Guitar M Lite 4 first. If you do not yet own an acoustic guitar library, it is well worth picking up.