

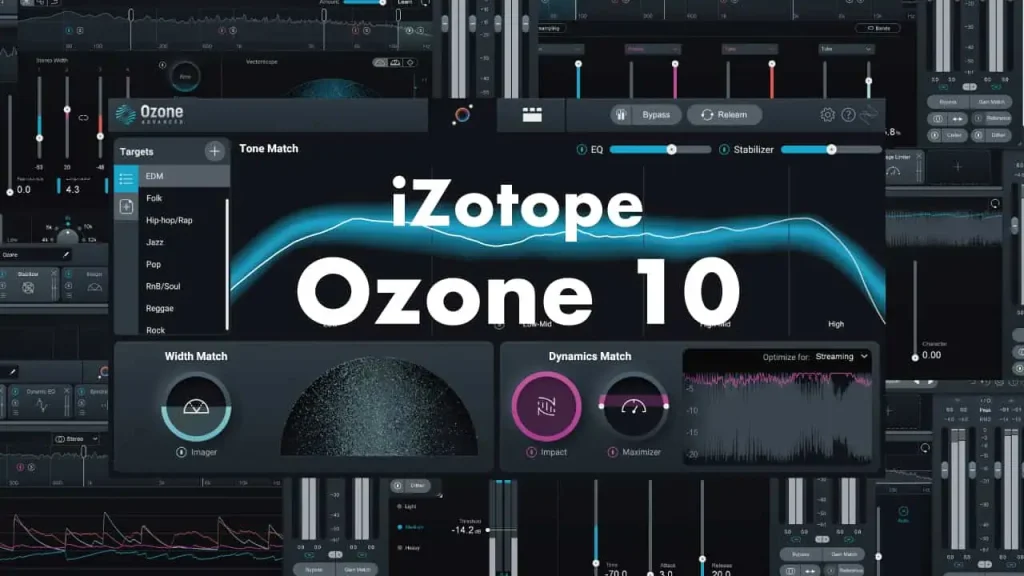
Ozone 10 has finally been released! Ozone is the go-to mastering tool for composers, and among plugins, it is currently in the spotlight as the top choice.
The Master Assistant’s AI function has undergone significant changes, and it appears to have a more modern and accurate approach than the previous version, with user-friendly features such as adjustments after using the assistant.
This article provides an easy-to-understand overview of Ozone 10, including explanations of its AI features. Additionally, professional engineers have contributed reviews of each effect and feature, so please refer to them for valuable insights.
1. What is iZotope “Ozone 10”?
Ozone 10 is a mastering plug-in effect developed by iZotope that can be inserted into the master track of a DAW to adjust the sound pressure of a 2Mix, among other things. Available as DAW extensions AU, AAX, AAX Audiosuite, and VST3 plug-ins.
Since Ozone 8, released two versions ago, AI features have been included, enabling it to cater to a wider range of needs. As a plugin effect with AI capabilities, Ozone is both beginner-friendly and highly regarded by many professionals due to its quality. Ozone is available in three variations: Elements, Standard, and Advanced.
It is worth noting that the provision of a standalone application (able to run as an application without a DAW) ended with Ozone 9. Therefore, launching Ozone 10 as a standalone application is not possible.
Ozone 10 has both an all-in-one plugin that integrates all effects, and individual plugins. While generally intended for mastering, in the Advanced version, they can also be used as separate effects, making them useful for track making. This versatility makes it a valuable tool in audio production.
- The Mothership plug-in: Includes all effects module chains and an AI-powered master assistant function.
- Component plug-ins: 16 individual effect plug-ins, available only in the Advanced version.
Ozone 10 Elements has just been released! How does it differ from other versions and what features does it include?
A new, low-cost version of Ozone 10 called Ozone 10 Elements is now available.
Ozone 10 Elements includes the AI Master Assistant and Assistant View, but does not include the individual effect modules.
| Development company | iZotope,inc. |
| Price (list price) | Ozone 10 Elements $129
Ozone 10 Standard $249 Ozone 10 Advanced $499 |
| Number of effects | 16 |
| Release date | September 13, 2022 |
Regarding bundle products that include Ozone
Packages may change periodically, and certain retailers may offer their own bundles.
Includes: (Ozone 10 Advanced / Neutron 4 / Nectar 3 Plus (w/ Melodyne Essential) / Tonal Balance Control 2 / Neoverb / Audiolens)
Price (list price): $699
Includes: (Neutron 4 / Symphony 3D / Stratus 3D / Brainworx bx_boom! / Brainworx bx_cleansweep Pro / Brainworx bx_delay 2500 / Brainworx bx_refinement / Brainworx bx_saturator V2 / Brainworx bx_subsynth / Ozone 10 Advanced / RX 10 Standard / Nectar 3 Plus (w/ Melodyne Essential) / Neoverb / Vocal Synth 2 Insight 2 / Tonal Balance Control 2 / Audiolens / Guitar Rig 6 Pro)
Price (list price): $999
Includes: (Ozone 10 Advanced / Neutron 4 / Nectar 3 Plus (w/ Melodyne Essential) / RX 10 Advanced / Dialogue Match / VocalSynth 2 / Insight 2 / Stutter Edit 2 / Exponential Audio Stratus 3D / Exponential Audio Symphony 3D / Tonal Balance Control 2 / Neoverb / Brainworx bx_boom! / Brainworx bx_cleansweep Pro / Brainworx bx_delay 2500 / Brainworx bx_refinement / Brainworx bx_saturator V2 / Brainworx bx_subsynth / Audiolens / Guitar Rig 6 Pro)
Price (list price): $2,499
Includes: (Ozone Elements / Neutron Elements / Nectar Elements / RX Elements)
Price (list price): $199
Includes: (Ozone 10 Standard / Neutron 4)
Price (list price): $399
This product is recommended for:
- Novice music producers
- Want to shorten mastering time
- Can’t achieve proper loudness, want to learn how to achieve it
iZotope Ozone 10 at Pluginboutique
Ozone 10 is also compatible with Splice Plugins.
Splice Plugins is a revolutionary service that allows users to access plugins through a monthly payment plan called “Rent-to-Own.” You can even access Ozone 10 through a monthly payment plan. For more information on Splice Plugins, check out this detailed article. Unlike traditional monthly payment plans, Splice Plugins doesn’t require you to make a full payment, and you can stop using the service anytime you want.
▶︎ Splice Plugins: Rent to Own VST Plugins, How to Register for a Free Trial and How to Buy
iZotope Official Launches Subscription Service
iZotope also offers an official subscription service, which uses the “Pro” designation instead of version numbers like Ozone “10”. With this service, all software is updated to the latest version. The Music Production Suite Pro is available for $19.99/month or $199/year.
- Neutron Pro
- Nectar Pro
- Vocalsynth Pro
- Ozone Pro
- RX Pro for Music
- Neoverb Pro
- Insight Pro
- Tonal Balance Control Pro
- Relay
- Visual Mixer
- Melodyne 5 Essential
2. What’s New in Ozone 10? What are the changes from Ozone 9?
To start, what distinguishes Ozone 10 from 9? What are the updates? Here are some of the new and enhanced features.
New features added for Advanced only
Here are the new features that have been added for Advanced users:
- New effect Stabilizer: dynamically shapes the mix for a clear, natural tone or improves the conversion of the listening environment by reducing problematic resonance, removing harshness, and smoothing transients.
- New Effect Impact: Four sliders control different frequency bands to bring mixes to life, add punch and dynamic space, or glue tracks together for a thicker sound.
- Audiolens included: Audiolens is an app that collects song characteristics directly from streaming platforms and mixes and masters them accordingly. This can be used to expand the target library.
New features added only for Standard and Advanced
- Magnify Soft Clip (in Maximizer Module): A new setting in the Miximizer Module allows you to increase loudness while maintaining faithful audio.
- Recover Sides (in the Imager Module): maintains stereo information in mono, preserving depth and power when narrowing down problem frequencies.
New features added for all versions
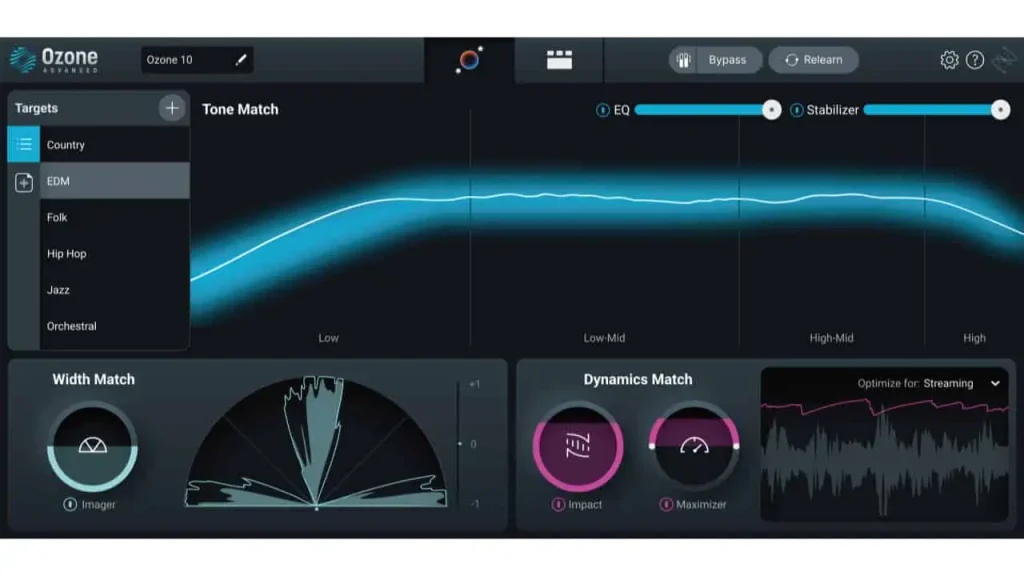
- AI Feature Improved Master Assistant: The Master Assistant has taken a big step forward. With cutting-edge matching technology for tone, dynamics, and width, you can now match the sound of a trusted reference file or today’s hit songs. In addition, the Tone Balance Curve in the Assistant View makes it easy to measure and adjust.
Additionally, there are other updates including native support for Apple silicon and a fresh look and feel for the interface.
3. The New Master Assistant
Similar to Ozone 9, Ozone 10 comes with the AI (Artificial Intelligence) feature called “Master Assistant.” This function makes it easy for beginners to adjust 2Mixes, saving a lot of time.
Benefits of Using Master Assistant
By utilizing the AI-powered “Master Assistant,” you can enjoy the following benefits:
- Even beginners can perform mastering
- Instantaneous adjustment of 2Mix, reducing mastering time
- Enables setting the balance and sound pressure to match the music you like
Typically, when trying to create instruments with good sound pressure and balance, beginners may end up with a less powerful sound compared to professionals. However, with this function, 2Mix with sound pressure can be achieved instantly, making it very helpful for beginners.
However, it is important not to rely solely on this feature. AI mastering is limited in certain aspects since it only applies certain effects. While learning mastering with the “Master Assistant” is useful, it is also important to do it yourself at the end.
The AI function is considered an “assistant” only. Although it is useful for quick and easy listening, iZotope recommends using it only as an aid.
Master Assistant has further evolved with Ozone 10!
The Master Assistant in Ozone 10 has undergone a significant change! In previous versions, you needed to configure Vintage or Modern processing and loudness settings beforehand. However, in Ozone 10, you only need to load your audio to complete the process without any preset configurations, and you can freely adjust the settings afterward in the Assistant View.
4. Every effect and function is thoroughly reviewed by a professional engineer!
Reviewer:Koukei Kou (Rec / Mix / PA / Arrange)
Lecturer at Kobe Koyo Music College in Japan
Spotify Playlist : https://open.spotify.com/playlist/2TskeAQyI0qYwohaAs3f82?si=CEc4Qt-oSyemv1czsQ1d8Q
Tumblr : https://watarukokei.tumblr.com/
I’ve been using the Ozone mastering plug-in since version 5, and it’s been a lifesaver when it comes to mastering. The latest update is truly impressive, and I’m blown away by how far auto-mastering has come.
The Master Assistant has been available since version 8, and I always rely on it for suggestions when dealing with tricky mastering processes. But this time, the Master Assistant is so good that I find myself saying, “This is perfect!” I’m really impressed with the quality of the Master Assistant this time around.
Master Assistant Review
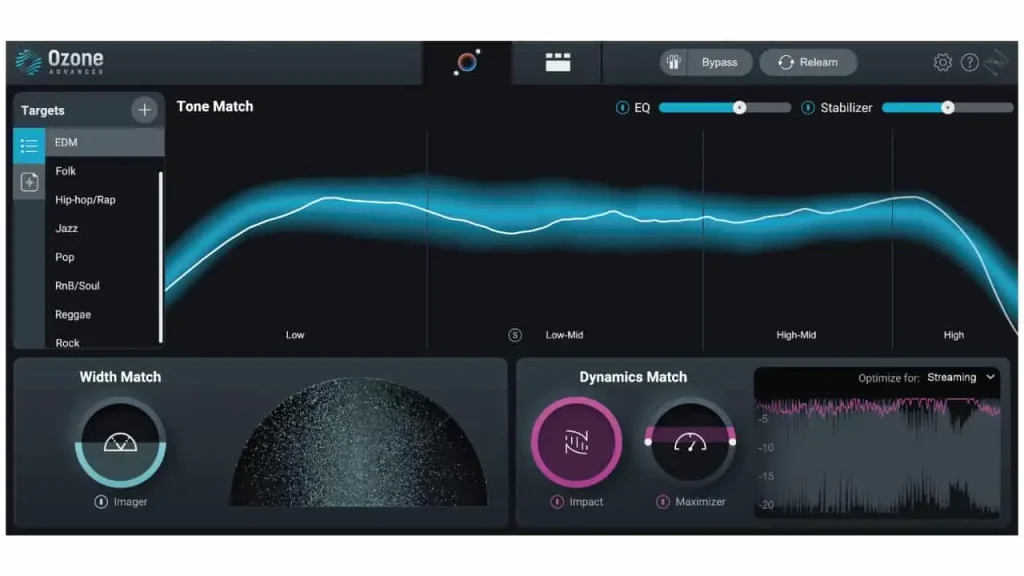
The Master Assistant function analyzes the high energy parts of a song, such as the chorus, and the AI automatically processes them to suit the song. In previous versions, it would process all songs uniformly, but with Ozone 10, it comprehensively adjusts the sound to suit the genre of music.
For example, if you’re mixing R&B, the Master Assistant will do R&B mastering. If you’re mixing Rock, it will do Rock mastering, and so on. It targets 10 genres, and you can also create your own reference file from your target mix. When you create a reference file, it will sound very close to the original.
I tested it out by creating a reference file of an artist’s work and applying it to my own mix. The result was quite close in taste, and I was able to check the differences between my mix and the reference, which I found useful.
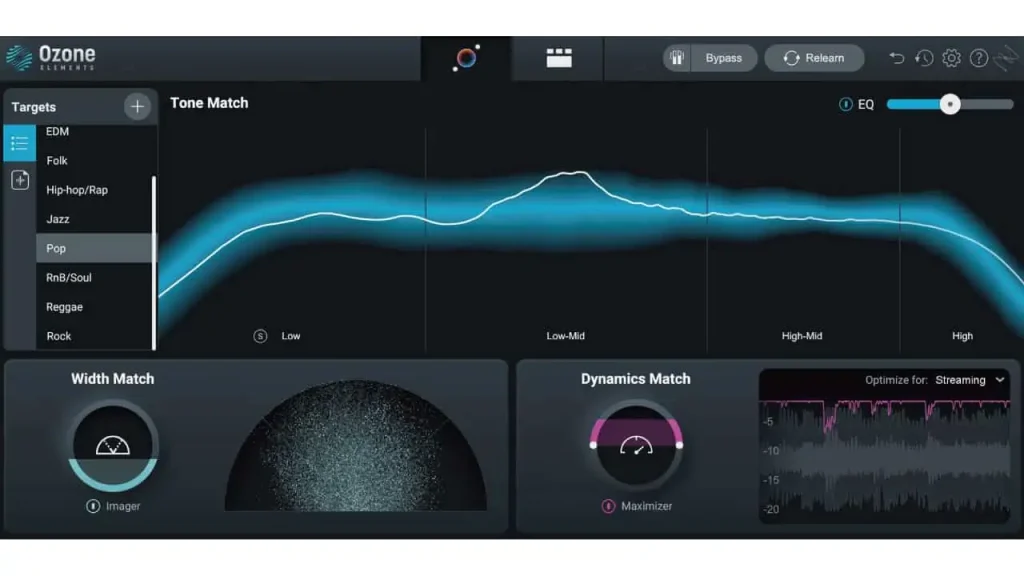
To use the Master Assistant, simply run it and select the target in the Assistant View. The genre is automatically selected, but you can choose a different one if needed. You can then adjust the tone, stereo width, and dynamics without detailed knowledge.
If you want to make more detailed adjustments, you can enter the module view for more precise control.
Review of 16 modules
- Equalizer: It is an 8-band parametric EQ that can process stereo, mid/side, and left/right. It has two modes: analog and digital, which differ in phase. Digital is used for surgical processing, while analog is used for overall color control. To make it easier to visualize things like phase shifts, it is recommended to check “ShowExtraCurves” in the settings.
- Match EQ: This is an EQ that uses over 8,000 bands to perform accurate matching. By capturing the source audio you want to match and the audio you want to apply it to, you can easily use EQ to bring them closer together. By adjusting the Smoothing and Amount, you can adjust the complexity and intensity of the EQ to create a more natural and seamless transition.
- Vintage EQ: This is a Pultec-type vintage EQ that works very well, so it is often used for coloring.
- Dynamic EQ: This is a 6-band dynamic EQ that allows you to choose between analog and digital types as well as stereo, mid/side, and left/right. Unlike static EQ, dynamic EQ can be used to process specific parts of a song, as it responds to bands that exceed certain thresholds.
- Dynamics: This is a multi-band compressor/limiter with up to 4 bands that can operate in stereo or mid/side. The bands are automatically divided with the “Learn” function, making it easy to use. Although I don’t usually use multi-band compression myself, I find it very easy to use and understand. While it has functions such as AutoGain and Adaptive Release, I personally prefer manual control as it prevents the mix from becoming too compressed.
- Vintage Comp: This is a vintage-type compressor with 3 modes, each with its own character and musicality. It has a detection filter that allows you to avoid excessive low frequencies or vocals.
- Vintage Limiter: This is a vintage limiter based on the Fairchild 670, with 3 different modes to choose from. It has a simple structure where you can select the mode, adjust the attack and release with the threshold and character, and determine the output with the ceiling. It is very easy to use and highly recommended.
- Maximizer: This is the Maximizer that is synonymous with Ozone. It has various IRC modes, so use them according to the situation. (Note that the recommended output level may vary depending on the final medium when using the Maximizer. Check Ozone’s website or various subscription websites for details.) SoftClip function has been newly added, making loudness control even easier. By using Transient Emphasis and Stereo Independence, you can create a more natural master.
- Exciter: This is a 4-band exciter that allows you to add saturation to each band. It has 7 different modes that can give you various colors. If your machine can handle it, use the oversampling mode for optimal performance.
- Vintage Tape: This is an analog tape simulator of the Studer A810 type. It is highly recommended as it can easily reproduce the effects of analog tape. It will definitely come in handy when you want to add some color to your sound.
- Imager: This is a multiband stereo imager with up to 4 bands. The new “RecoverSides” function has been added, which is a feature that complements the lost side volume when reducing the stereo width. This is an incredibly useful feature!
- Spectral Shaper: This plugin can instantly reduce problematic frequency bands. It is useful for suppressing unpleasant peak components that occasionally occur during mastering. You can check the affected area in solo mode, making it very user-friendly.
- Low End Focus: This is a plugin that specializes in low-frequency issues. It can easily solve punch and muddiness problems. Use “Punchy” for enhancing transients and “Smooth” for strengthening sustain.
- Master Rebalance: This plugin allows you to adjust the balance of tracks, vocals, bass, and drums. Although it is not often used in mastering, the effect is significant. One plugin can only adjust one type of level.
- Impact: This is a new module added in this version. It can expand or narrow dynamics for each frequency band, and the effect is intuitive. You may get hooked on the new experience of dynamic plugins. It can be very useful for pulling out buried attacks in music, or reducing excessive parts.
- Stabilizer: This is also a newly added module that dynamically applies EQ by detecting the difference between the target tonal balance and the current music state. You can choose a frequency characteristic curve that suits your music by selecting the target tonal balance. You can even create your own tonal balance from your own music using the Master Assistant.
Ozone 10 review summary
With the Ozone update, mastering has become genre-specific, highlighting the importance of creating a unique sound for each genre. I highly recommend Ozone 10 as a go-to mastering tool.
iZotope Ozone 10 at Pluginboutique
5. Compare the differences between Ozone 10 Standard, Advanced, and Elements and Ozone 9! Which One Should You Buy?
Differences between Ozone 10 Standard, Advanced, and Ozone 9 Advanced
The main differences between Ozone 10 Standard, Advanced, and Ozone 9 Advanced are as follows
| Ozone 10 Standard | Ozone 9 Advanced | Ozone 10 Advanced | |
| Stabilizer | ◯ | ||
| Impact | ◯ | ||
| Audiolens | ◯ | ||
| Tonal Balance Control | ◯ | ◯ | |
| Master Rebalance | ◯ | ◯ | |
| Low End Focus | ◯ | ◯ | |
| Spectral Shaper | ◯ | ◯ | |
| Codec Preview | ◯ | ◯ | |
| stand-alone | ◯ |
About the version to buy
First of all, to summarize, if you’re planning to make a purchase, it’s highly recommended to go with the Advanced version.
Purchasing the Advanced version provides the following benefits:
- Stabilizer and Impact: As shown in the table, the new effects Stabilizer and Impact are only available in Ozone 10 Advanced. The previously added effects, such as Low End Focus and Master Rebalance, are also still only available in Advanced. Stabilizer and Impact are effects used in the AI-powered Master Assistant. The functionality and ease of use of the Master Assistant differ between Ozone 10 Standard and Advanced, as well as Ozone 9 Advanced.
- Can be used as individual effect plugins: Only Advanced can be used as separate effect plugins. The mothership plugin, which contains all the functions, can be heavy, but it is possible to reduce it by using only the necessary individual plugins.
- Comes with Audiolens: A new app called Audiolens has been released and comes bundled with Ozone 10 Advanced. Audiolens allows you to collect the characteristics of music directly from streaming platforms without spending time downloading audio files or configuring DAW, and seamlessly connect with Ozone 10 and Neutron 4 to mix and master according to the collected characteristics. You can use this to expand your target library.
- Comes with Tonal Balance Control: Similar to Ozone 9 Advanced, Tonal Balance Control is included. You can use it to check the overall balance at the end, and if you have taken the wrong balance due to differences in monitor environments and sensations, such as not being able to produce sound at home, you can see the correction points by looking at Tonal Balance Control. You can also achieve the same balance as your favorite songs.
- Codec Preview: Codec Preview is a feature that corrects data loss when converting to MP3 or ACC. This feature is also only available in Advanced.
Please note: Functions only available in Ozone 9
Of course, the latest version often has more improvements, but there are also some features that are only available in the previous version, Ozone 9.
- Standalone mode (can be launched without a DAW)
- Master Assistant with vintage module selection
Those who have been using the standalone mode should pay attention to this.
6. How to buy
There are two things you need to know before buying Ozone10
- Upgrade / Crossgrade
- Bundle
About Upgrade / Crossgrade

If you already own a product from iZotope, you may be eligible for an upgrade or crossgrade.
Examples include:
- Upgrade from ~
- Crossgrade from ~
- Crossgrade from any paid iZotope product
If you have one of the eligible products, make sure to take advantage of these upgrade and crossgrade options.
About Bundle
If you’re considering buying Ozone 10 Advanced, there are package deals available that offer better value than the standalone product. We highly recommend checking out the Mix & Master Bundle Advanced or the Music Production Suite 5.2.
Includes: (Ozone 10 Advanced / Neutron 4 / Nectar 3 Plus (w/ Melodyne Essential) / Tonal Balance Control 2 / Neoverb / Audiolens)
Price (list price): $699
Includes: (Neutron 4 / Symphony 3D / Stratus 3D / Brainworx bx_boom! / Brainworx bx_cleansweep Pro / Brainworx bx_delay 2500 / Brainworx bx_refinement / Brainworx bx_saturator V2 / Brainworx bx_subsynth / Ozone 10 Advanced / RX 10 Standard / Nectar 3 Plus (w/ Melodyne Essential) / Neoverb / Vocal Synth 2 Insight 2 / Tonal Balance Control 2 / Audiolens / Guitar Rig 6 Pro)
Price (list price): $999
Especially if you don’t already have Neutron 4, which helps with AI-assisted track creation, or Nectar 3, an AI-assisted vocal effect, it’s recommended to purchase them together. The crossgrade + package that combines these two is the most cost-effective option.
iZotope Ozone 10 at Pluginboutique
7. Sale Information on Ozone 10
iZotope products go on sale frequently, not just during Black Friday. Some products are discounted up to 50%, while others up to 90% off. There are also limited-time packages available at certain times of the year, including the Black Friday Bundle, Music Maker’s Bundle, Holiday Bundle, and the First-time iZotope Set, among others, which are often heavily discounted. These packages are only available for a limited time and are not sold after the sale period. Additionally, Elements may be given away for free, and both Ozone 8 and 9 Elements are available for a limited time at no cost.
Summary
The Ozone series is a mastering tool suitable for beginners and professionals alike. If you’re a music producer, it’s definitely worth having, but if you’re buying, Advanced is the only choice. However, please note that it cannot be used as a standalone. Additionally, purchasing through a crossgrade + package option is the most cost-effective method. We hope this article has been helpful to you.
iZotope Ozone 10 at Pluginboutique